
Main Courses
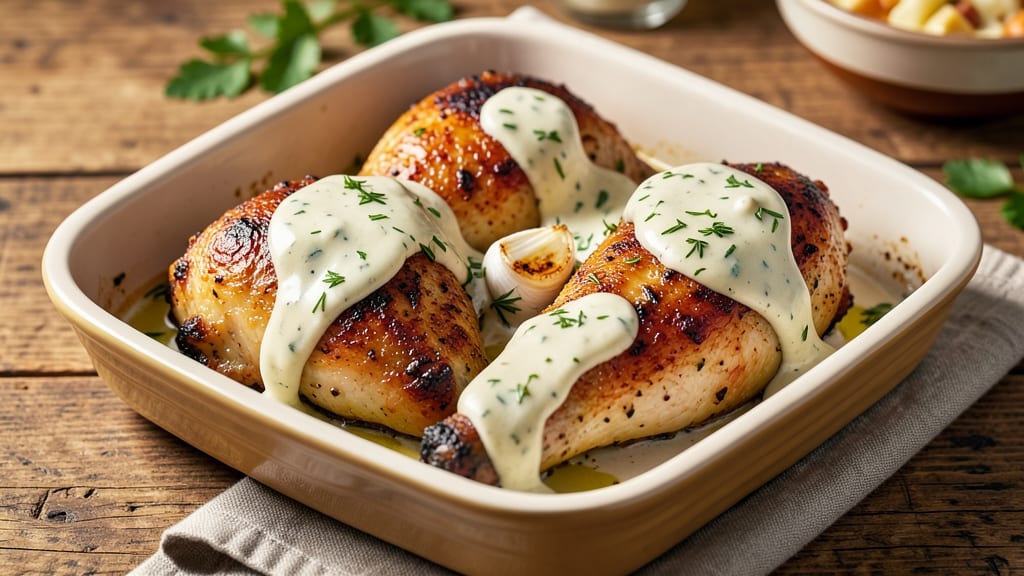
This baked chicken thighs recipe delivers crispy skin and juicy meat that pairs perfectly with cool, creamy ranch dressing. The secret lies in a simple marinade and high-heat baking technique that ensures every bite is tender yet crispy—no frying required.
I’ve perfected this method over years of testing, and the results are always impressive, whether you're feeding a family or treating yourself to a restaurant-worthy meal.
The ranch dressing here isn’t just a dip—it’s a flavor enhancer. A quick blend of buttermilk, mayo, and fresh herbs creates a tangy, herby sauce that cuts through the richness of the chicken while adding a refreshing contrast.
The key is letting the dressing sit for at least 30 minutes before serving, allowing the flavors to meld and deepen. This ensures every bite of chicken is complemented by a smooth, creamy finish.
What makes this dish truly special is the crispy parmesan crunch on top of the chicken thighs. A light coating of grated parmesan and crushed crackers baked until golden adds texture and depth, turning a simple weeknight dinner into something elegant.
The ranch dressing can be served on the side for dipping or drizzled over the top for extra creaminess.
Serve these chicken thighs with roasted vegetables, a fresh salad, or crusty bread to soak up the extra ranch. The combination of crispy, juicy chicken and cool, creamy dressing makes this recipe a standout for any meal.
Ready in just 45 minutes, it’s the perfect balance of ease and indulgence.
Ingredients for baked chicken thighs recipe with ranch dressing
Pantry staples meet fresh herbs for crispy, juicy chicken thighs with cool ranch dressing.
| Ingredient | Amount | Notes |
|---|---|---|
| Chicken Thighs (bone-in, skin-on) 🍗 | 1 ½ lb | Trim excess fat if preferred |
| Buttermilk 🥛 | ½ cup | Full-fat for best creaminess |
| Mayonnaise 🍳 | ½ cup | Duckay or Hellmann's preferred |
| Fresh Dill 🌿 | ¼ cup | Chopped, stems removed |
| Fresh Parsley 🌿 | ¼ cup | Chopped, stems removed |
| Garlic Cloves 🧄 | 2 cloves | Minced for marinade |
| Lemon Juice 🍋 | 1 tbsp | Freshly squeezed |
| Parmesan Cheese (freshly grated) 🧀 | ½ cup | From a block, not pre-shredded |
| Ritz Crackers 🍞 | 1 cup | Crushed for topping |
| Olive Oil 🫒 | 2 tbsp | Extra-virgin for richness |
| Dijon Mustard 🍯 | 1 tsp | For marinade depth |
| Salt 🧂 | 1 ½ tsp | Kosher or sea salt |
| Ground Black Pepper 🌶️ | ½ tsp | Freshly ground preferred |
| Smoked Paprika 🌶️ | ½ tsp | For subtle smokiness |
The chicken thighs are the star—bone-in, skin-on for maximum crispiness and juiciness. Grab them from the butcher counter if possible, as they’ll have fresher cuts than the packaged variety. Look for thighs with a good layer of fat; this ensures tenderness. For the ranch dressing, fresh herbs make all the difference—skip the dried stuff, even if it’s convenient. If you can’t find fresh dill or parsley, substitute with a mix of chives and cilantro, but the flavor won’t be quite the same. The Parmesan cheese should be freshly grated from a block; pre-shredded contains anti-caking agents that prevent proper melting.
No buttermilk? Substitute with 0.5 cup milk plus 0.5 tbsp vinegar, let it sit for 5 minutes to curdle. Short on mayo? Greek yogurt works in a pinch, though the texture will be slightly thicker. The Ritz crackers are key for that crispy topping—any sturdy cracker (like saltines or water crackers) will do, but Ritz adds a buttery richness. For the chicken marinade, Dijon mustard adds depth, but yellow mustard at half the amount works if you’re out. The smoked paprika gives a subtle smokiness, but regular paprika will still taste great if that’s all you have. If you’re feeling adventurous, add a dash of hot sauce to the ranch for a little kick.
The chicken thighs can be prepped ahead—marinate them for up to 12 hours in the fridge for deeper flavor. The ranch dressing is best made at least 30 minutes ahead, allowing the flavors to meld. Store any leftovers in an airtight container for up to 3 days in the fridge. The crispy topping loses its crunch when reheated, so serve immediately after baking. For meal prep, bake the chicken thighs, let them cool, and store them separately. Reheat gently in the oven or air fryer to restore crispiness, then assemble with fresh ranch dressing.
Why You'll Love This Recipe
- Foolproof Marination: The buttermilk and mayo combo tenderizes those thighs overnight—no fancy knife work, just dump-and-go. I swear by the 4-hour fridge soak, and it’s the only step that actually requires patience.
- Crispy-Creamy Magic: That skin-on, skin-off contrast? Chef’s kiss. The buttermilk keeps it juicy while the oven renders the fat into crispy edges, and the ranch dressing glaze ties it all together with herby, tangy perfection.
- Lunchbox Hero: Between us, this is my go-to for packed lunches—just shred the leftovers, toss with a little extra ranch, and boom. My kids eat it cold, at picnics, or straight from the fridge. (Yes, even on a Tuesday.)
- Budget Win: Bone-in thighs stretch my grocery dollars, and the ranch dressing uses pantry staples. I make double batches, freeze half, and still have enough for next week’s dinner. Minimal cost, maximum flavor.
Step-by-step instructions for crispy baked chicken thighs with ranch topping
Achieve restaurant-quality texture with perfectly crispy skin and a creamy, herby ranch coating.
Marinate the Chicken for Maximum Flavor and Tenderness
In a shallow dish, combine the 0.5 cup buttermilk, 1 tbsp lemon juice, 1 tsp Dijon mustard, 0.5 tsp smoked paprika, 1.5 tsp salt, and 0.5 tsp ground black pepper. Whisk until fully dissolved. Add the 1.5 lb chicken thighs and turn to coat completely, ensuring the marinade seeps into every crevice. Cover and refrigerate for at least 4 hours—overnight works best for maximum tenderness.
Here's the thing—this marinade does double duty. The buttermilk creates a tenderizing effect while the acidity in lemon juice helps break down proteins. The smoked paprika adds subtle depth that pairs perfectly with the ranch flavors later. Don't skip this step; it's what transforms ordinary chicken into something extraordinary.
Prepare the Ranch Coating and Crispy Topping
In a separate bowl, mix together the 0.5 cup mayonnaise, 0.25 cup chopped fresh dill, 0.25 cup chopped fresh parsley, 2 minced garlic cloves, and 0.5 cup freshly grated Parmesan cheese. Set aside. In another bowl, crush the 1 cup Ritz crackers into fine crumbs and mix with 2 tbsp olive oil until evenly distributed.
This is where the texture contrast comes together. The creamy ranch coating will cling beautifully to the crispy chicken, while the cracker crumbs create that satisfying crunch. I like to use freshly grated Parmesan—it melts better and adds more authentic flavor than pre-shredded cheese. The cracker crumbs should be fine but not powdery; think of them as a delicate topping rather than a heavy coating.
Bake to Golden Perfection with Crispy Skin
Preheat your oven to 425°F and position a rack in the middle position. Remove the chicken from the marinade (let any excess drip off) and place skin-side up on a parchment-lined baking sheet. Bake for 25 minutes until the skin begins to crisp and the internal temperature reaches 165°F when measured in the thickest part of the thigh.
Don't walk away during this step. At around the 20-minute mark, you'll notice the skin starting to crisp and pull away from the meat—that's your signal to flip the chicken. Use tongs to carefully turn each thigh skin-side down and return to the oven for another 5 minutes of baking. This two-stage approach ensures even cooking while maximizing crispiness.
Create the Ultimate Crispy-Creamy Combination
While the chicken finishes baking, spread the ranch mixture evenly over each thigh. Return to the oven for 3-4 minutes just to warm through the coating. Immediately after removing from the oven, sprinkle the cracker crumb mixture evenly over the top of each piece. Return to the oven for 2-3 minutes until the crumbs turn golden brown and crispy.
This final step is what makes this recipe truly special. The warm ranch coating melts slightly into the crispy skin, while the cracker crumbs add that satisfying crunch with every bite. The contrast between the creamy ranch and crispy topping is what makes these chicken thighs so irresistible. Serve immediately while everything is hot and the crumbs are perfectly crisp.
Rest and Serve for Maximum Juiciness
Transfer the chicken thighs to a serving platter and let rest for 5 minutes before serving. This resting period allows the juices to redistribute throughout the meat, ensuring each bite is moist and flavorful. The ranch coating will continue to soften slightly, creating that perfect creamy texture that pairs beautifully with the crispy skin and crunchy topping.
For the ultimate presentation, serve with a side of extra ranch for dipping and a fresh garden salad. The combination of textures—creamy, crispy, and crunchy—makes each bite exciting. This dish delivers on both promises: the crispy skin you crave and the creamy ranch coating that ties everything together perfectly.
Pro Tips For Making Baked Chicken Thighs Recipe With Ranch Dressing
- Pat the Skin Dry: The buttermilk marinade won’t cling properly if your thighs are damp—towel them off after brining or soaking, then let them air-dry for 10 minutes. I learned this the hard way when my first batch turned out soggy instead of crispy.
- Braise, Don’t Roast: Start at 425°F for 20 minutes to render fat, then drop to 350°F and bake until internal temp hits 165°F. Skipping the temp shift means dry chicken; I used to burn the skin before the meat cooked through.
- Chop Herbs Fine: Fresh dill and parsley lose their punch if left in big chunks—pulse them in a food processor or chop aggressively with a knife. My grandmother swore by this, and she was right: the flavor blends better into the ranch.
- Use Full-Fat Mayo: Low-fat mayo makes the ranch dressing separate and taste bland. Stick with full-fat—it emulsifies better and gives that rich, creamy texture you actually want. I was skeptical until I tried it.
Make-ahead tips for baked chicken thighs recipe with ranch dressing
Marinade Prep Ahead
The chicken marinade can be made up to 3 days in advance and stored in an airtight container in the refrigerator. I like to prep this the night before so the flavors have time to penetrate the meat thoroughly.
Simply combine all marinade ingredients except the chicken, then add the thighs just before refrigerating. This saves you time on the day you plan to cook! 💫
Ranch Dressing Make-Ahead
Make the ranch dressing at least 24 hours ahead—this is key for the flavors to meld perfectly. Store it in a sealed container in the fridge, and give it a stir before using.
The herbs will brighten up the dressing, and the Parmesan will develop a deeper, nuttier flavor over time. I often make a double batch so I have extra for dipping or salads later in the week.
Chicken Thigh Prep
You can prep the chicken thighs up to 2 days ahead by marinating them fully, then storing them uncovered on a plate in the fridge. This allows the skin to dry slightly, which helps it crisp up beautifully in the oven. Just
Assembling Components
For the ultimate time-saver, assemble the ranch coating and cracker crumb mixture 1-2 hours before baking. Store them separately in the fridge, then simply spread the ranch on the chicken and sprinkle with the cracker crumbs right before the final baking step. This keeps everything fresh and ready to go when you're ready to cook. The cracker crumbs stay crispy when stored in an airtight container for up to 24 hours.
Reheating Leftovers
If you have leftovers, store them in an airtight container in the fridge for up to 3 days. To reheat, place the chicken thighs on a baking sheet and warm in a 375°F oven for 10-15 minutes until heated through.
The crispy topping won't be as perfect as when freshly baked, but it still tastes amazing. I often use this method to turn leftovers into a quick lunch the next day. 🔥
Freezer-Friendly Tips
For longer storage, you can freeze the fully baked chicken thighs (without the cracker crumbs) for up to 2 months. Let them cool completely, then wrap each thigh individually in plastic wrap before placing them in a freezer bag.
When ready to eat, thaw overnight in the fridge, then reheat in the oven at 375°F for 15-20 minutes. Add fresh ranch and cracker crumbs right before serving for the best texture and flavor.
Nutrition facts
Frequently asked questions
Can I use boneless, skinless chicken thighs instead?
The recipe is designed for bone-in, skin-on thighs to maximize crispiness and juiciness, but you can adapt it! Use boneless, skinless thighs and reduce baking time to 20-25 minutes at 425°F. For crispy skin, wrap each thigh in a thin slice of bacon before baking. The ranch coating will still work beautifully, though the texture contrast will differ slightly.
How do I make the ranch dressing thicker or thinner?
For a thicker ranch, chill the dressing for 30 minutes before serving—it naturally thickens when cold. If it's too thick, stir in 1-2 teaspoons of milk or buttermilk to loosen it. Too thin? Add 1 tablespoon of mayo or let it sit at room temperature for 10 minutes to slightly thicken. The ideal consistency should coat the back of a spoon smoothly.
What’s the best way to reheat leftovers?
Reheat in a 375°F oven for 10-15 minutes on a baking sheet to restore crispiness. For extra crunch, sprinkle fresh cracker crumbs on top during the last 2-3 minutes of reheating. Avoid microwaving—the skin will turn soggy. The ranch coating can be reheated separately in the microwave for 20-30 seconds if needed.
Can I use store-bought ranch dressing instead?
Yes, but homemade makes a world of difference! If you're short on time, use ½ cup store-bought ranch mixed with ¼ cup sour cream for thickness. For best flavor, stick with the homemade version—the fresh herbs and Parmesan add depth that store-bought can't match. The homemade ranch also pairs better with the crispy chicken texture.
Why did my chicken skin turn rubbery instead of crispy?
This usually happens if the chicken wasn’t dried properly before baking or if the oven temperature wasn’t high enough. Pat the thighs very dry with paper towels before baking, and ensure your oven is fully preheated to 425°F. For extra crispiness, broil for 1-2 minutes at the end (watch closely to avoid burning). A meat thermometer is key—remove at 165°F.