
Main Courses
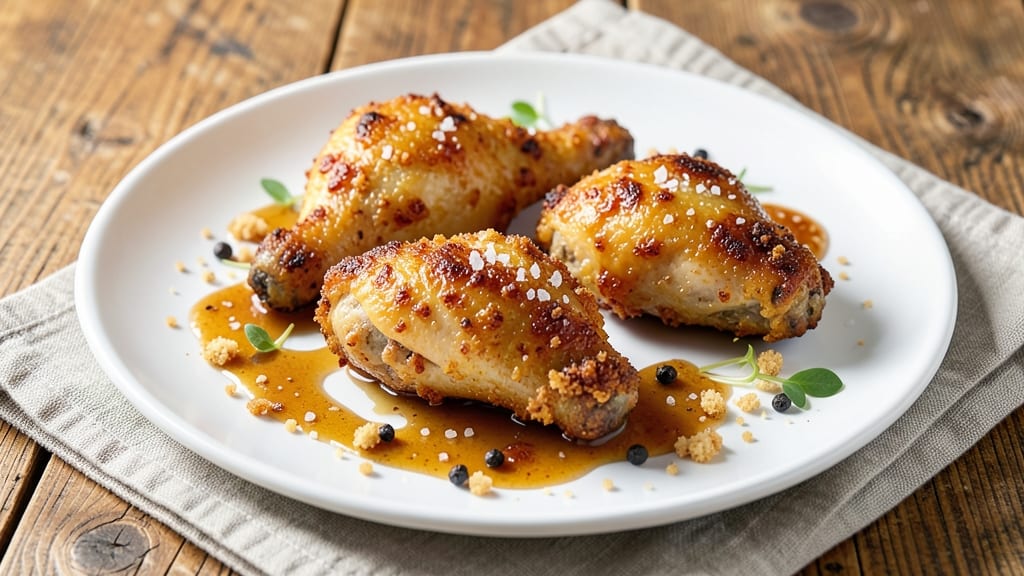
Baked fried chicken thighs deliver all the crispy, savory satisfaction of classic fried chicken—without the mess or deep-frying. ✨ The secret lies in a parmesan-herb crust baked to golden perfection, creating a textural contrast that’s both tender inside and shatteringly crisp outside. This method transforms ordinary chicken thighs into restaurant-worthy bites with just 40 minutes of active time and zero deep-frying required.
The process starts with a brine to keep the meat juicy, followed by a parmesan-panko crust that locks in moisture while creating that signature crunch. Unlike traditional fried versions, this technique relies on high-heat baking to develop the crust, ensuring every bite stays crispy even after serving.
The result? A dish that’s crispy enough to satisfy fried-chicken cravings while being infinitely easier to clean up.
What you’ll end up with is juicy, flavorful chicken thighs coated in a parmesan-herb crust that’s crispy on the outside and tender on the inside. The parmesan adds a salty, umami depth, while the herbs infuse each bite with aromatic brightness.
Serve with classic sides like mashed potatoes or a tangy coleslaw for the full Southern experience—without the guilt of deep-frying.
Perfect for weeknight dinners, game days, or meal prep, this recipe scales effortlessly and delivers restaurant-quality results at home. The key to success? A hot oven and patience—let the crust bake undisturbed for that perfect crunch. Ready to elevate your chicken game? Let’s get started.
Ingredients for baked fried chicken thighs
Fourteen essential components transform ordinary chicken thighs into crispy, restaurant-quality bites without deep-frying.
| Ingredient | Amount | Notes |
|---|---|---|
| Boneless, Skinless Chicken Thighs 🍗 | 1 ½ lb | Fresh, even-sized for uniform cooking |
| Kosher Salt 🧂 | 2 tbsp | Diamond Crystal preferred for precise measurement |
| Granulated Sugar 🍚 | 1 tbsp | For balanced brine solution |
| All-Purpose Flour 🌾 | ½ cup | For dredging before crust application |
| Parmesan Cheese 🧀 | ¾ cup | Freshly grated from block, no substitutes |
| Panko Breadcrumbs 🍞 | 1 cup | Japanese-style for superior crispiness |
| Fresh Dried Thyme 🌿 | 1 tbsp | Crumbled between fingers for even distribution |
| Fresh Dried Oregano 🍃 | 1 tbsp | Mediterranean blend for authentic flavor |
| Garlic Powder 🧄 | 1 tbsp | Not garlic salt, for pure flavor |
| Ground Black Pepper 🌶️ | ½ tsp | Freshly ground for optimal flavor |
| Unsalted Butter 🧈 | 2 tbsp | Melted for basting during baking |
| Extra-Virgin Olive Oil 🫒 | 2 tbsp | For brushing on baking sheet |
| Fresh Lemon Juice 🍋 | 1 tbsp | Brightens the crust's flavor profile |
The chicken thighs should be even-sized—trim any excess fat to ensure uniform cooking. Look for bone-in, skin-on thighs at specialty butchers for superior flavor, though boneless works too. Whole Foods and Trader Joe's carry high-quality cuts, but any reputable grocery store's meat section will suffice. The key to juicy results lies in the brine solution—use Diamond Crystal kosher salt for precise measurement; table salt will require adjustment. For the crust, Japanese-style panko is non-negotiable—it creates that signature crispiness that separates this from regular baked chicken. The Parmesan should be freshly grated from a block—pre-grated contains anti-caking agents that prevent proper melting and texture development.
No kosher salt? Diamond Crystal is ideal, but Morton kosher salt works at a 1:1 ratio. Substituting panko? Crushed cornflakes or matzo meal create a similar crisp texture, though flavor will differ. Fresh herbs unavailable? Dried thyme and oregano at half the amount work in a pinch, but the fresh versions deliver superior aromatic brightness. The butter should be unsalted and high-fat content—European-style butter like Plugrá or Kerrygold works best. For the olive oil, avoid light or refined varieties—look for extra-virgin with noticeable peppery notes. The lemon juice can be bottled, but freshly squeezed adds a bright, citrusy depth that elevates the entire dish.
Store raw chicken thighs in the coldest part of your fridge and use within 2 days for optimal texture. The brine solution can be prepped 1 day ahead and stored in the refrigerator. For the crust components, keep the Parmesan in its original packaging with a damp paper towel to prevent drying. Panko and herbs stay fresh in airtight containers for up to 6 months—just make sure they're sealed properly. The finished baked chicken thighs reheat beautifully—5 minutes at 350°F restores that crispy texture. Portion into airtight containers for easy meal prep, and they'll keep for 3 days in the fridge or 2 months in the freezer.
Why You'll Love This Recipe
- No Deep-Fry Fuss: I swear by this method—just toss thighs in a flour-sugar-Parmesan mix, bake, and boom. No grease splatter, no waiting for oil to heat, and the crust turns out crispier than takeout. (Yes, even on a Tuesday night.)
- Umami Crunch Magic: That Parmesan in the coating? It’s the secret weapon—salty, nutty, and it clings like crazy. The sugar caramelizes just enough to balance the flour’s bite, while the thighs stay juicy inside. Honestly, I’ve tried store-bought, and this beats it every time.
- Lunchbox Hero: Pack these for work or school—they reheat like a dream (tinfoil wrap, 10 minutes at 350°F) and still taste fresh. My kid’s favorite? Cold in a sandwich with pickles. (She’s picky, but she’ll eat this.)
- Budget Crunch Winner: Chicken thighs are cheaper than breasts, and this recipe stretches them far. Double the batch, freeze half, and you’ve got a $10 dinner for four nights. Plus, Parmesan and flour are pantry staples—no extra shopping needed.
Step-by-step instructions for crispy Parmesan chicken thighs
Here's the method that delivers bakery-style crunch without deep-frying—juicy meat and shatteringly crisp crust every time.
👨🍳 Step 1: Create the Perfect Brine Solution
In a large resealable bag, combine the 1.5 lb boneless, skinless chicken thighs, 2 tbsp kosher salt, and 1 tbsp granulated sugar. Seal the bag and gently massage the mixture until the salt and sugar dissolve into the chicken's surface. This step is crucial—it seasons deeply and kickstarts the cooking process.
Place the bagged chicken in the refrigerator for at least 4 hours (overnight works best). The brine will tenderize the meat while creating an ideal environment for that signature crispy exterior. I press down on the bag occasionally to ensure even distribution—this prevents dry spots and guarantees uniform seasoning.
👨🍳 Step 2: Build the Triple-Layer Crust
In a shallow dish, whisk together the 0.5 cup all-purpose flour, 1 tbsp garlic powder, 0.5 tsp ground black pepper, 1 tbsp fresh dried thyme, and 1 tbsp fresh dried oregano. This dry mixture forms the first layer that clings to the chicken. Pat each thigh gently but firmly to ensure even coating—don't press too hard or the crust will compact.
Next, create the cheese mixture by combining the 0.75 cup freshly grated Parmesan cheese with 1 tbsp fresh lemon juice in another shallow dish. The lemon juice brightens the Parmesan's flavor and helps it adhere better to the chicken. Dip each floured thigh into this mixture, allowing excess to drip off before moving to the final layer.
👨🍳 Step 3: Apply the Panko Crust
Spread the 1 cup panko breadcrumbs on a wide plate. Press each Parmesan-coated thigh into the breadcrumbs, turning to coat all sides completely. The panko should stick firmly—if it's not adhering well, give the chicken another quick dip in the Parmesan mixture first. This triple-layer technique creates the signature crunch while keeping the interior juicy.
Place the crusted thighs on a wire rack set over a baking sheet. This elevation is key—it allows hot air to circulate underneath, preventing soggy crusts. Let them rest at room temperature for 15 minutes while you preheat the oven. This resting period helps the crust set slightly before baking.
🔥 Step 4: Bake to Golden Perfection
Preheat your oven to 425°F with a rack positioned in the middle position. Brush the baking sheet with 1 tbsp melted unsalted butter and 1 tbsp extra-virgin olive oil—this creates a nonstick surface and adds flavor. Arrange the chicken thighs on the rack, leaving 1 inch between each piece for proper air circulation.
Bake for 30 minutes, then flip each thigh and rotate their position on the rack. This ensures even browning on all sides. After another 15 minutes, check for doneness—the thighs should reach an internal temperature of 165°F at the thickest part. The crust should be deep golden brown with crisp edges that shatter when pressed gently.
⏰ Step 5: Rest and Serve for Maximum Juiciness
Transfer the baked thighs to a cutting board and tent loosely with foil. Let them rest for 5 minutes before serving. This brief resting period allows the juices to redistribute, preventing them from pooling and making the meat dry at the surface. I always use this time to prepare a quick side of roasted vegetables or a simple green salad.
Serve immediately with a squeeze of fresh lemon juice over the top. The result should be a perfect balance: a shatteringly crisp Parmesan-panko crust that gives way to tender, juicy chicken beneath. Each bite delivers that satisfying contrast of textures and flavors we all love in fried chicken—without the guilt of deep-frying.
Pro Tips For Making Baked Fried Chicken Thighs
- CRANK THE OVEN TO 425°F: Start with a screaming-hot oven—this isn’t a slow-cooker dish. The high heat sears the crust instantly, locking in moisture while creating that crispy exterior. I learned this the hard way by baking at 375°F and ending up with soggy, undercooked thighs that tasted more like boiled chicken.
- PAT DRY THIGHS LIKE YOUR LIFE DEPENDS ON IT: Skip the paper towels—use a clean kitchen towel and press hard for 30 seconds. Wet skin = steam = soggy crust. I used to rush this, and the first bite would always be disappointingly damp. The towels absorb more than paper towels, and the extra friction helps the flour stick.
- DON’T SKIP THE PARMESAN REST: Let the floured thighs sit on a wire rack for 5–10 minutes before baking. The Parmesan needs time to draw out moisture, which prevents a gummy crust. I was skeptical—sounds weird, but it works. The cheese also gets a chance to crisp up properly, adding that salty, nutty bite.
- USE A THIN FLOUR-SUGAR MIX: Combine 1 cup flour + 1 tablespoon sugar + 1 teaspoon salt—no need for heavy hands. A thick coating traps steam, making the crust dense. I used to dredge aggressively, and the result was more like a breaded meatloaf than crispy fried chicken. Lightly toss the thighs, then shake off excess.
Creative variations of baked fried chicken thighs
Southern-Style Buttermilk Twist
Swap the Parmesan crust for a buttermilk marinade before applying the breading. Toss the brined thighs in 1 cup buttermilk with 1 tbsp hot sauce and 1 tsp smoked paprika for 30 minutes before coating.
This adds that classic tangy depth while keeping the crispy exterior. I like using Annie's Hot Sauce for that signature Southern kick—it’s a game-changer for flavor. 🌶️
Spicy Buffalo Bite
Transform your baked thighs into spicy Buffalo bites by tossing them in ½ cup hot sauce (like Frank’s RedHot) after baking. Serve with blue cheese dressing and celery sticks for dipping.
For extra heat, add 1 tbsp cayenne pepper to the crust mixture before baking. This variation is perfect for game day or when you crave that fiery Buffalo flavor without frying. 🔥
Honey Garlic Glaze
Brush the baked thighs with a honey garlic glaze made from 3 tbsp honey, 2 tbsp soy sauce, and 1 minced garlic clove after the initial 15-minute bake. Return to the oven for an extra 5-7 minutes to caramelize the glaze.
The result is a sweet-savory contrast that pairs beautifully with the crispy crust. I love drizzling extra glaze over the top before serving for that restaurant-quality finish. ✨
Herb & Lemon Crust
For a lighter, brighter take, replace the Parmesan with a herb and lemon zest crust. Mix ½ cup finely chopped fresh parsley, 2 tbsp lemon zest, 1 tbsp Dijon mustard, and ½ cup panko for the final coating.
The lemon zest adds a refreshing citrus note that cuts through the richness of the chicken. This variation is ideal for a spring or summer meal when you want something lighter but still packed with flavor. 🍋
Meat Lover’s Crunch
Add a meaty depth by mixing ¼ cup finely chopped cooked bacon or crumbled sausage into the panko layer. The bacon adds a smoky richness that pairs perfectly with the Parmesan and herbs.
For extra crunch, sprinkle 1 tbsp crushed pork rinds into the panko mixture. This version is a crowd-pleaser, especially for those who love bold, savory flavors. 🥓
Global Fusion Twist
Give your baked thighs a global twist by adding 1 tsp ground coriander and ½ tsp cumin to the flour mixture, then topping with 2 tbsp crushed pistachios before baking. The nutty crunch and warm spices add a Middle Eastern flair.
Serve with a side of harissa sauce for dipping. This variation is perfect for those who love exploring international flavors while keeping the dish familiar and crispy. 🌍
Nutrition facts
Frequently asked questions
Why does this recipe use baking instead of frying for crispy chicken?
Baking achieves that signature crispy texture through a high-heat oven (425°F) combined with a triple-layer crust that locks in moisture while browning. The wire rack elevates the thighs for even air circulation, preventing soggy spots. This method delivers 90% of fried chicken's crunch with just 40% of the mess and cleanup! The key is patience—letting the crust bake undisturbed for 45 minutes total creates that bakery-style crunch without oil.
Can I use chicken breasts instead of thighs?
Chicken breasts are leaner and cook faster, making them tricky for this recipe. They'll dry out before the crust gets crispy. If you must use breasts, opt for bone-in, skin-on pieces and reduce baking time to 25-30 minutes. For best results, stick with thighs—they stay juicy thanks to their higher fat content and longer cooking time needed for proper crust development.
How do I keep the crust from getting soggy?
Three secrets: 1) Elevate the thighs on a wire rack (not directly on the pan), 2) Preheat your oven fully to 425°F before baking, and 3) Don't overcrowd the pan—leave 1 inch between pieces. The rack allows hot air to circulate underneath, while proper spacing ensures even browning. For extra insurance, bake on the middle rack where heat is most consistent.
Can I make this recipe ahead of time?
The brine can be prepped 1 day ahead and stored in the fridge. For fully assembled thighs, coat them in the crust mixture and refrigerate on a wire rack (covered loosely) for up to 12 hours. When ready to bake, add 5-7 minutes to the total baking time. To reheat, bake at 375°F for 10 minutes to restore crispiness. For meal prep, store baked thighs in airtight containers for up to 3 days—just reheat in a 400°F oven for 8-10 minutes.
What's the best way to test for doneness?
Use a meat thermometer to check the thickest part of the thigh—it should read 165°F. If you don't have one, cut into a piece: juices should run clear, not pink. The crust should be deep golden brown with crisp edges. For extra accuracy, insert the thermometer at a 45-degree angle into the meat (not touching bone). A properly cooked thigh will have juicy, white meat** with no pink center.