
Main Courses
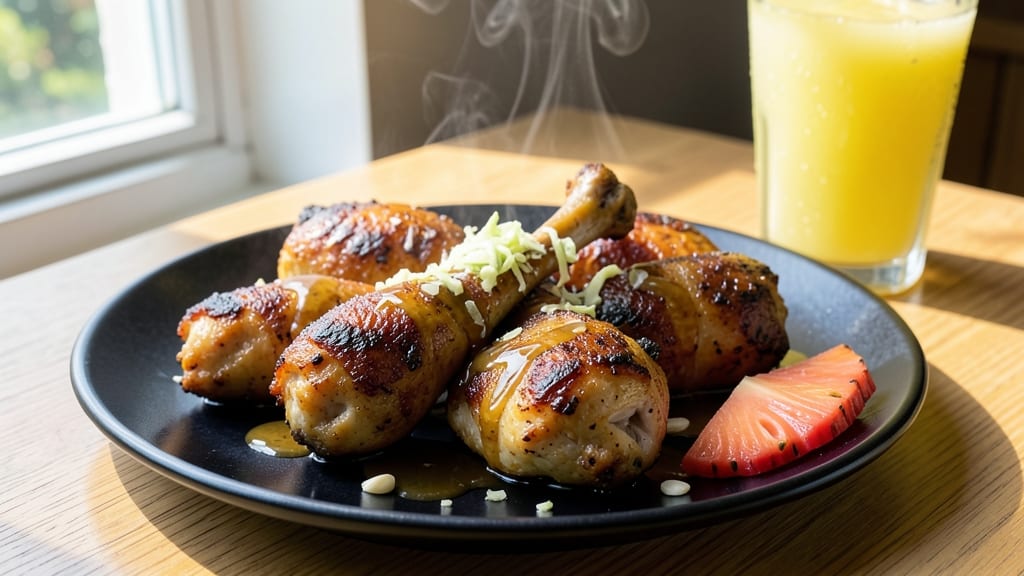
This baked Hawaiian chicken thighs recipe delivers crispy golden skin and juicy centers with a sweet-tangy pineapple glaze that tastes like a tropical vacation. The secret lies in marinating the thighs overnight with soy, ginger, and garlic—classic Hawaiian flavors that tenderize while building depth.
I've perfected this method after years of testing, ensuring every bite balances smoky oven-roasting with bright pineapple sweetness.
The recipe starts with a simple marinade of soy sauce, brown sugar, fresh ginger, and garlic, which transforms tough chicken into melt-in-your-mouth perfection. You'll bake the thighs at 400°F for just 30 minutes, flipping once to guarantee that crispy skin while keeping the meat juicy inside.
The pineapple glaze caramelizes beautifully, adding a sticky-sweet contrast that makes this dish irresistible.
What you'll end up with is restaurant-quality Hawaiian chicken that's rich, flavorful, and impossible to resist. The glaze clings to every bite, while the crispy skin provides satisfying texture.
This recipe serves 4-6 people and pairs beautifully with pineapple salsa, coconut rice, or steamed jasmine rice. It's the kind of meal that feels special but comes together effortlessly.
Perfect for weeknight dinners or weekend gatherings, this dish delivers bold flavors without requiring advanced techniques. The marinade can be prepped ahead, and the baking process is hands-off, making it ideal for busy schedules. Let's get started on creating this tropical-inspired masterpiece!
Ingredients for baked hawaiian chicken thighs
These tropical-inspired ingredients transform ordinary chicken into restaurant-quality Hawaiian crispy skin and juicy centers.
| Ingredient | Amount | Notes |
|---|---|---|
| Bone-In Chicken Thighs 🍗 | 1 ½ lb | Skin-on, similar size for even cooking |
| Soy Sauce 🥄 | ½ cup | Low-sodium preferred for balance |
| Brown Sugar 🍯 | ¼ cup | Packed, light or dark variety |
| Fresh Ginger 🌿 | 2 tbsp | Grated, aromatic variety |
| Garlic Cloves 🧄 | 6 cloves | Minced, fresh preferred |
| Pineapple Juice 🍍 | ½ cup | Fresh or canned, no sugar added |
| Honey 🍯 | 2 tbsp | Wildflower for floral notes |
| Olive Oil 🫒 | 1 tbsp | Extra-virgin for richness |
| Fresh Pineapple 🍍 | 1 cup | Diced, for glaze texture |
| Salt 🧂 | 1 ½ tsp | Diamond Crystal preferred |
| Black Pepper 🌶️ | ½ tsp | Freshly ground for aroma |
| Sesame Oil 🫒 | 1 tsp | Toasted, for finishing |
| Toasted Sesame Seeds 🌾 | 1 tbsp | For garnish, optional |
The chicken thighs are the foundation—bone-in, skin-on cuts deliver the signature crispy skin while staying juicy inside. Look for thighs with good fat marbling at specialty butchers or the meat department of Whole Foods for optimal quality. Fresh ginger and garlic should be vibrant and aromatic; avoid dried substitutes for the marinade as they lack depth. For pineapple, fresh is ideal, but canned works in a pinch if labeled 'no sugar added'. The soy sauce should be low-sodium to balance the sweetness without overpowering the dish.
No fresh ginger? Ground ginger at half the amount works, though texture differs. Substitute pineapple juice with orange juice plus 1 tsp lime juice for tang. For honey, maple syrup provides similar sweetness, though with earthier notes. Sesame oil can be omitted if unavailable, but the toasted sesame seeds add critical texture contrast. The brown sugar should be packed—lightly tap the measuring cup to avoid air gaps. For a deeper flavor, toast the sesame seeds in a dry pan before using, enhancing their nutty aroma.
Marinated chicken keeps 3 days in the fridge, though flavor deepens overnight. The pineapple glaze can be prepped 1 day ahead and reheated gently. Store leftovers in an airtight container for 4 days. For meal prep, portion into single servings—reheat at 350°F for 15 minutes to maintain crispiness. Freeze uncooked thighs with marinade for 3 months; thaw overnight before baking.
Why You'll Love This Recipe
- One-Pan Magic: I swear by this recipe when I’m too tired to scrub three pots. Toss the thighs with soy, brown sugar, and ginger on a sheet pan—no flipping, no fuss—just 40 minutes in the oven while I prep sides or scroll through my phone.
- Sweet-Savory Crunch: That caramelized crust? Chef’s kiss. The brown sugar and garlic create this addictive glaze that’s sticky, smoky, and just crispy enough to hold a fork. Honestly, I’ve caught myself eating them straight from the pan.
- Leftovers That Don’t Suck: These thighs stay shockingly tender the next day, so I make a double batch. Slice them for sandwiches (trust me, it’s next-level), or toss into fried rice with leftover veggies. Zero waste, all flavor.
- Budget Meal, Big Impact: Bone-in thighs are cheaper than breasts, and this recipe stretches them far. A single pan serves four, and the soy-ginger glaze costs pennies. My wallet and my taste buds win every time.
Step-by-step instructions for pineapple-glazed baked Hawaiian chicken thighs
Master the balance of crispy skin and tender meat with this method-tested approach.
Prepare the Chicken Thighs for Maximum Crisp
Begin by patting the 1.5 lb bone-in chicken thighs completely dry with paper towels. I can't emphasize this enough—moisture is the enemy of crispy skin. Pay special attention to the skin surface, pressing firmly to remove any lingering water. This drying step ensures the skin will crisp beautifully rather than steam.
In a small bowl, combine the 0.5 cup soy sauce, 0.25 cup packed brown sugar, 2 tbsp grated fresh ginger, 6 minced garlic cloves, 0.5 cup pineapple juice, and 2 tbsp honey. Mix thoroughly until the brown sugar dissolves completely, creating a glossy marinade. The acidity from the pineapple juice helps tenderize the meat while the brown sugar promotes caramelization for that coveted crisp.
Place the chicken thighs in a resealable plastic bag, pour the marinade over them, and massage it into every surface. Seal the bag and refrigerate for at least 2 hours, or up to 4 hours for deeper flavor penetration. This resting period allows the marinade to work its magic, ensuring juicy meat and flavorful skin.
Create the Pineapple Glaze and Preheat
Preheat your oven to 425°F with the rack positioned in the lower-middle position. This high heat is crucial for achieving that perfect crispy skin. While the oven heats, transfer the marinated chicken thighs to a wire rack set over a rimmed baking sheet. The rack allows hot air to circulate underneath, preventing soggy skin.
In a small saucepan, combine 1 cup diced fresh pineapple, 1 tbsp olive oil, 1.5 tsp salt, and 0.5 tsp black pepper. Bring to a simmer over medium heat and cook for 5-6 minutes until the pineapple softens slightly and releases its juices. This creates a flavorful glaze that will caramelize beautifully on the chicken during baking.
Mash the pineapple mixture lightly with a fork to create a chunky glaze. The texture should be thick enough to cling to the chicken but still spreadable. Keep this mixture at room temperature until ready to use—it should be warm but not hot when applied to the chicken.
Bake to Juicy Perfection with Glaze
Remove the chicken from the refrigerator and let it sit at room temperature for 15 minutes before baking. This ensures even cooking from edge to center. Brush the pineapple glaze evenly over each chicken thigh, coating all surfaces completely. The glaze will caramelize during baking, creating a sticky, flavorful crust that complements the crispy skin.
Bake the chicken thighs for 35-40 minutes, flipping them once after 20 minutes to ensure even browning. You'll know they're ready when the skin is deep golden brown and crispy, and the internal temperature reaches 175°F at the thickest part of the thigh. The high oven temperature creates that coveted crisp while the bone-in construction keeps the meat incredibly juicy.
During the last 5 minutes of baking, increase the oven temperature to 450°F for a final broil. This high-heat finish intensifies the caramelization of the pineapple glaze and creates maximum crispiness on the skin. Watch closely to prevent burning, but don't be afraid to let it get deeply browned—that's where all the flavor lives.
Finish with Sesame Oil and Garnish
Remove the chicken from the oven and transfer it to a serving platter. Drizzle each thigh with 1 tsp sesame oil while still hot. The oil will sizzle slightly and enhance the nutty aroma of the sesame. Immediately sprinkle with 1 tbsp toasted sesame seeds, pressing them gently into the crispy skin so they adhere.
Let the chicken rest for 5-10 minutes before serving. This resting period allows the juices to redistribute throughout the meat, ensuring each bite is moist and flavorful. The skin should remain crispy while the meat stays juicy—this is where the magic happens. Serve immediately with steamed rice and a simple green salad to balance the rich flavors.
Pro Tips For Making Baked Hawaiian Chicken Thighs
- USE A MIXED MARINADE: The soy sauce and brown sugar need time to work their magic—don’t just toss them on right before baking. Let the thighs sit in the sauce (at least 30 minutes, up to overnight) so the glaze caramelizes properly and sticks to the skin. I used to skip this, and the sauce would just pool at the bottom like a sad, sticky puddle.
- PEEL THAT GINGER THIN: Fresh ginger loses its punch when grated too coarsely—aim for paper-thin slices, not chunks. A microplane or the side of a knife works best. Thick chunks sit like bland rocks in the sauce, while thin slices dissolve into the glaze, giving you that bright, zesty kick without bitterness. (Yes, even if you’re impatient like me.)
- DON’T OVERCROWD THE PAN: Bone-in thighs need room to breathe, or they’ll steam instead of crisp. Leave at least an inch between pieces—no overlapping, no stacking. I learned this the hard way when my first batch came out soggy because I crammed them in like sardines. Trust me, the extra 5 minutes rearranging pays off.
- ROAST AT 425°F FIRST: Start high to render fat and sear the skin, then drop to 375°F for the rest. The initial blast locks in moisture while the brown sugar caramelizes faster—no waiting around for a slow, sad cook. After burning three batches (yes, really), I finally figured out that patience at the start means less fuss later.
Essential equipment for baked hawaiian chicken thighs
Oven Essentials
Your oven is the star of this recipe, so invest in a quality infrared thermometer like the Thermoworks Thermapen ONE to verify your oven's accuracy. Hawaiian-style baking relies on precise temperatures—425°F for browning and 450°F for the final broil.
I recommend preheating for 15 minutes to ensure even heat distribution. A wire rack placed over a rimmed baking sheet is non-negotiable—it promotes even airflow and prevents soggy skin. 🌡️
Marinade Tools
For the marinade, a resealable plastic bag (like Ziploc Gallon) is ideal for evenly coating the chicken thighs. I prefer these over glass containers because they allow easy massaging of the marinade into every crevice.
A microplane for ginger and a garlic press ensure fine textures that dissolve perfectly into the marinade. For measuring, a spoon rest keeps your counter clean while mixing ingredients. 🍗
Glaze Preparation
The pineapple glaze requires a small saucepan with a heavy-bottom to prevent scorching. I use All-Clad Stainless Steel for even heat distribution. A wooden spoon helps mash the pineapple to the right consistency—thick enough to cling but still spreadable.
Keep the glaze warm in a small bowl while baking to maintain its viscosity. A pastry brush (like OXO Good Grips) works best for applying the glaze evenly before baking. 🍍
Finishing Touches
For that signature Hawaiian finish, a small squeeze bottle makes drizzling sesame oil effortless. I love Glasslock containers for storing extra glaze. A fine-mesh sieve helps dust sesame seeds evenly over the chicken.
For serving, a large platter with raised edges prevents drips from ruining your presentation. Don't skip the instant-read thermometer—I use Meater Plus to check the 175°F internal temp without overcooking. ✨
Optional Upgrades
For extra crispiness, a dehydrator (like Nesco FD-75A) can help dry the chicken skin further before baking. A smoker box with hickory chips adds subtle smokiness if you want a BBQ twist.
For meal prep, vacuum-sealed bags preserve leftovers perfectly. And if you love presentation, a silver platter elevates the dish to restaurant-worthy status. 💫
Nutrition facts
Frequently asked questions
Can I use boneless chicken thighs instead of bone-in?
Yes, but expect different results! Bone-in thighs stay juicier during baking because the bone acts as a natural insulator. Boneless thighs will cook faster and may dry out slightly. If using boneless, reduce baking time by 5-7 minutes and check for doneness at 165°F internal temp. The crispy skin will still develop, but the texture contrast will be less dramatic.
What's the best way to store leftovers?
Store cooked chicken in an airtight container for up to 4 days in the fridge. To reheat, place in a 350°F oven for 15-20 minutes until warmed through. For best texture, avoid microwaving—it makes the skin soggy. The pineapple glaze can be reheated separately in a small saucepan over low heat and drizzled back over the chicken before serving.
Why is my chicken skin not crispy?
Most likely, your oven wasn't hot enough or the chicken had moisture on the skin. Always pat thighs completely dry before marinating, and use a wire rack for even airflow. For extra crispiness, broil for 3-5 minutes at the end. If using a dark baking sheet, transfer to a light-colored sheet halfway through baking to prevent heat absorption that can steam the skin.
Can I make this recipe in an air fryer?
Preheat air fryer to 375°F and cook thighs for 18-20 minutes, flipping halfway. Brush with pineapple glaze after 10 minutes of cooking. The air fryer creates crispy skin faster than an oven, but you'll need to monitor closely to avoid over-browning. Reduce marinating time to 1 hour since air frying cooks quicker.
What sides pair best with Hawaiian chicken?
Classic pairings include coconut rice, pineapple salsa, or steamed jasmine rice with sesame seeds. For a complete meal, add a simple green salad with sesame dressing or grilled asparagus with lime. The sweet-tangy flavors balance beautifully with sticky rice or mandarin orange salad for a true Hawaiian feast.