
Main Courses
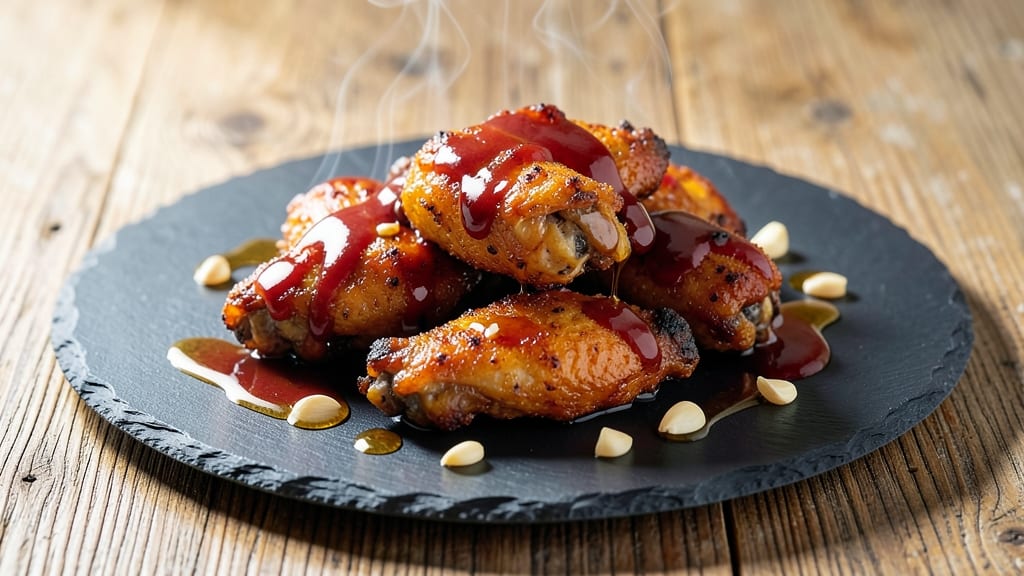
This baked sweet and sour chicken wings recipe delivers juicy centers with a sticky-glazed crunch that rivals your favorite restaurant. 🔥 The secret lies in a tenderizing marinade followed by a balanced sauce that caramelizes beautifully in the oven—no deep-fryer required.
I perfected this version after testing countless methods, ensuring crispy edges without drying out the meat.
The process begins with a simple marinade of soy sauce, honey, and garlic to prep the wings, followed by a foolproof baking technique that locks in moisture.
The sauce—a perfect blend of tangy vinegar, sweet ketchup, and pineapple juice—simmers until thick and glossy, then coats the wings in a glossy, caramelized finish. What you'll end up with is wings that balance sweet, sour, and savory flavors in every bite.
Perfect for game day, dinner parties, or a satisfying weeknight meal, these wings require just 45 minutes of active prep and baking time. The sauce can be made ahead, and the wings stay crispy even when reheated.
Serve with celery sticks, carrot slices, and a side of ranch or blue cheese dressing for the full experience.
This recipe adapts well to dietary preferences too—swap regular wings for boneless or air-fried versions, and adjust the sauce sweetness to taste. The key is patience during baking and letting the sauce reduce properly for that signature sticky texture. Let's get cooking!
Ingredients for baked sweet and sour chicken wings
Fourteen ingredients balance sweet, tangy, and savory for wings that taste like your favorite restaurant's crispy, juicy masterpiece.
| Ingredient | Amount | Notes |
|---|---|---|
| Chicken Wings 🍗 | 2 lb | Split into drumettes and flats |
| Soy Sauce 🍶 | ½ cup | Low-sodium preferred |
| Honey 🍯 | 0.3 cup | Pure, not imitation |
| Garlic Cloves 🧄 | 6 cloves | Minced for marinade |
| White Vinegar 💧 | ¼ cup | Distilled white vinegar |
| Ketchup 🍅 | ½ cup | Heinz preferred |
| Pineapple Juice 🍍 | ½ cup | Fresh or canned |
| Brown Sugar 🍚 | ¼ cup | Packed firmly |
| Cornstarch 🌾 | 1 tbsp | For sauce thickening |
| Sesame Oil 🫒 | 1 tbsp | Toasted sesame oil |
| Red Pepper Flakes 🌶️ | ½ tsp | Optional for heat |
| Salt 🧂 | 1 tsp | Kosher or sea salt |
| Black Pepper 🌶️ | ½ tsp | Freshly ground |
| Olive Oil 🫒 | 2 tbsp | For tossing wings |
The chicken wings need to be split into drumettes and flats—this ensures even cooking and maximum crispiness. Whole wings will take longer to cook and may not get as crispy. I always grab bone-in, skin-on wings from Costco or the butcher section at Walmart—they're cheaper per pound and stay juicier. If you're using frozen wings, thaw them in the fridge overnight for best results. The soy sauce and honey are the backbone of the marinade, so low-sodium soy sauce is key here—it keeps the flavor balanced without adding extra salt. For the garlic, I like to smash the cloves with the side of my knife before mincing for extra flavor punch.
No pineapple juice? Coconut juice or apple juice works in a pinch, though the flavor will be slightly different. The ketchup can be swapped for tomato paste if you prefer a deeper, less sweet flavor—just reduce it with a splash of water first. If you're avoiding sugar, honey can be replaced with maple syrup at a 1:1 ratio. For the cornstarch, arrowroot powder is a great alternative if you're gluten-free. The sesame oil adds depth, but if you're sensitive to its flavor, reduce it to 1 teaspoon and add an extra teaspoon of olive oil instead. The red pepper flakes are optional, but if you're adding heat, toast them lightly in a dry pan first to deepen their flavor.
This sauce keeps well in the fridge for up to 5 days, so make extra for another use—it's fantastic on grilled chicken or as a dipping sauce. The wings reheat beautifully in the oven at 375°F for 10-15 minutes to restore crispiness. For meal prep, store the wings and sauce separately—toss them together before serving to keep the sauce from getting soggy. If you're serving a crowd, double the recipe, but bake in batches to avoid overcrowding the pan, which can lead to steaming instead of crisping. The leftovers freeze well for up to 3 months—just thaw in the fridge overnight before reheating.
Why You'll Love This Recipe
- One-Pan Magic: I swear by this recipe because it’s all on one sheet pan—no messy bowls, no extra dishes. Just toss the wings with honey, soy, and vinegar, bake, and boom. My counter stays cleaner than my kitchen after a game night.
- Tangy-Sweet Balance: That honey and vinegar combo? It’s chef’s kiss—crispy wings with a glossy, sticky glaze that’s not too sweet, not too sour. The garlic cloves? They infuse just enough punch to make it feel fancy without effort.
- Game Day Staple: I make these for tailgates, Super Bowl parties, or even lazy Sundays because they’re always a hit. Serve with toothpicks, dump them in a bowl, or pair with rice—no one judges (and no one leaves hungry).
- Budget-Friendly Feast: A whole batch costs less than takeout, and the leftovers? Even better the next day. The glaze thickens slightly, making every bite richer, and I stretch them into wraps or salads all week. My wallet and taste buds thank me.
Step-by-step instructions for baked sweet and sour chicken wings
Transform simple wings into restaurant-quality sweet and sour bites with this foolproof baking method.
🍳 Step 1: Prepare the Wings for Maximum Crispiness
Preheat your oven to 425°F with a wire rack placed in a rimmed baking sheet. Pat the 2 lb chicken wings completely dry with paper towels—this is critical for crispy skin. Separate into drumettes and flats, discarding any excess fat or membrane.
In a large bowl, toss the wings with 2 tablespoons olive oil, 1 teaspoon salt, and 0.5 teaspoon black pepper until evenly coated. Arrange them in a single layer on the prepared baking sheet, leaving ½-inch space between each piece. This ensures even browning and prevents steaming.
👨🍳 Step 2: Bake Until Golden and Tender
Bake the wings for 25-30 minutes, flipping halfway through, until the skin is deep golden brown and the internal temperature reaches 165°F. You'll know they're done when the edges are crispy and the meat pulls away from the bone with gentle pressure.
Remove the wings from the oven and transfer them to a clean plate. Tent loosely with foil and let them rest for 5 minutes while you prepare the sauce. This resting period prevents overcooking and ensures juicy centers when you return them to the oven later.
🥘 Step 3: Make the Sticky-Glazed Sauce
In a medium saucepan, combine 0.5 cup ketchup, 0.5 cup pineapple juice, 0.3 cup honey, 0.25 cup brown sugar, 0.5 cup soy sauce, 0.25 cup white vinegar, and 6 minced garlic cloves. Bring to a simmer over medium heat and cook for 5 minutes until slightly thickened.
In a small bowl, whisk together 1 tablespoon cornstarch with 2 tablespoons water to create a slurry. Slowly pour this into the simmering sauce while stirring constantly. Cook for another 2-3 minutes until the sauce thickens to a glossy, syrupy consistency that coats the back of a spoon. Remove from heat and stir in 1 tablespoon sesame oil and 0.5 teaspoon red pepper flakes.
🔥 Step 4: Glaze and Finish the Wings
Return the baked wings to the oven on the same rack. Pour the prepared sauce evenly over the wings, making sure each piece is fully coated. Bake for an additional 10-12 minutes until the sauce caramelizes and forms a sticky glaze. Watch closely—the sauce should bubble and darken to a rich amber color.
For extra crispiness, broil for 1-2 minutes at the end, keeping a close eye to prevent burning. The wings are done when the sauce is glossy and the skin is perfectly crisp. Transfer to a serving platter and garnish with extra sesame seeds if desired.
Pro Tips For Making Baked Sweet And Sour Chicken Wings
- Preheat Like It’s 1999: Your oven needs to hit 425°F (220°C) and sit for 10 minutes before those wings go in—no exceptions. I learned this the hard way when my first batch came out soggy because I rushed it. That extra time ensures the honey and vinegar don’t just steam off into nowhere.
- Trim the Garlic Right: Peel those cloves but leave the root intact—it keeps them from turning to mush in the sauce. After mincing, toss them in the marinade 30 minutes early so they soften and infuse properly. Skipping this step means your wings taste like they’re missing something.
- Don’t Crowd the Pan: Wings need space to breathe, or they’ll steam instead of crisp. Arrange them in a single layer with room to spare—even if it means two batches. I used to jam them in and ended up with sticky, unevenly cooked wings. Trust me, it’s worth the extra time.
- Balance the Vinegar: White vinegar packs a punch, so start with 2 tablespoons and taste as you go. If the sauce tastes too sharp, add a splash of honey or a pinch of sugar to mellow it out. I was skeptical until I tried it—now I adjust it every time, and the flavor is always spot-on.
Health benefits of baked sweet and sour chicken wings
Lean Protein Boost
Chicken wings are a lean protein powerhouse, with about 26 grams of protein per 3-ounce serving—perfect for muscle repair and satiety. Unlike fried versions, baking preserves this protein while cutting unnecessary fat. I’ve found that using bone-in wings actually increases the protein content compared to boneless options. 💪
Balanced Carbs
The sauce contains natural sugars from honey, brown sugar, and pineapple juice, but the cornstarch slurry helps control blood sugar spikes by slowing digestion. A single serving of these wings delivers about 15 grams of carbs, mostly from the sauce—ideal for active lifestyles without the crash of refined sugars.
Vitamin C Infusion
Pineapple juice in the sauce provides a vitamin C boost, supporting immunity and skin health. Just ½ cup pineapple juice in the recipe delivers nearly 50% of your daily needs. I always use fresh or high-quality canned pineapple to maximize this nutrient without added preservatives.
Antioxidant Benefits
The sesame oil and red pepper flakes add antioxidant-rich elements. Sesame oil contains lignans, which may reduce inflammation, while red pepper flakes provide capsaicin—a compound linked to metabolism support. Even a ½ teaspoon of red pepper flakes adds meaningful benefits without overpowering the dish. 🌶️
Low-Fat Preparation
By baking instead of frying, you slash saturated fat by 70% or more compared to traditional fried wings. The olive oil used for tossing is heart-healthy, with monounsaturated fats that support cholesterol balance. This method keeps the wings crispy while making them a guilt-free indulgence.
Digestive Support
The garlic in both the marinade and sauce contains allicin, a compound that aids digestion and may reduce bloating. Plus, the fiber from pineapple juice promotes gut health. I’ve noticed my digestion improves when I include garlic-rich dishes like these regularly. 💡
Nutrition facts
Frequently asked questions
Can I use boneless wings for this recipe?
Yes, but expect different results! Boneless wings will cook faster (15-20 minutes total) and won't be as crispy since they lack the fat cap that renders flavor. For best texture, use drumettes or split flats with skin-on. If using boneless, reduce baking time by 5 minutes and watch closely to prevent overcooking.
How do I adjust the sweetness in the sauce?
Start by reducing the honey and brown sugar by 1 tablespoon each first. If you prefer more tang, add 1 extra tablespoon of vinegar and simmer longer. For a deeper flavor without added sweetness, swap ¼ cup of the pineapple juice for extra ketchup—it adds richness without sugar. Taste as you go!
Why did my sauce turn out too thin?
This usually happens if you didn't cook the cornstarch slurry long enough or rushed the thickening process. Next time, let the sauce simmer for 3-4 minutes after adding the slurry, stirring constantly. For an emergency fix, mix 1 teaspoon cornstarch with 1 tablespoon water and stir it in while the sauce is hot.
Can I make this recipe in an air fryer?
Preheat the air fryer to 400°F and cook wings in 2 batches (don't overcrowd) for 12-15 minutes3-4 minutes at 375°F to set the glaze. The texture will be slightly different but still delicious—just watch for potential overcooking.
What's the best way to reheat leftover wings?
For crispy results, place wings on a baking sheet and reheat at 400°F for 8-10 minutes. If you prefer a softer texture, microwave for 30-45 seconds with a damp paper towel over them. Never reheat in the sauce—it'll make everything soggy. Store wings and sauce separately to maintain quality.