
Main Courses
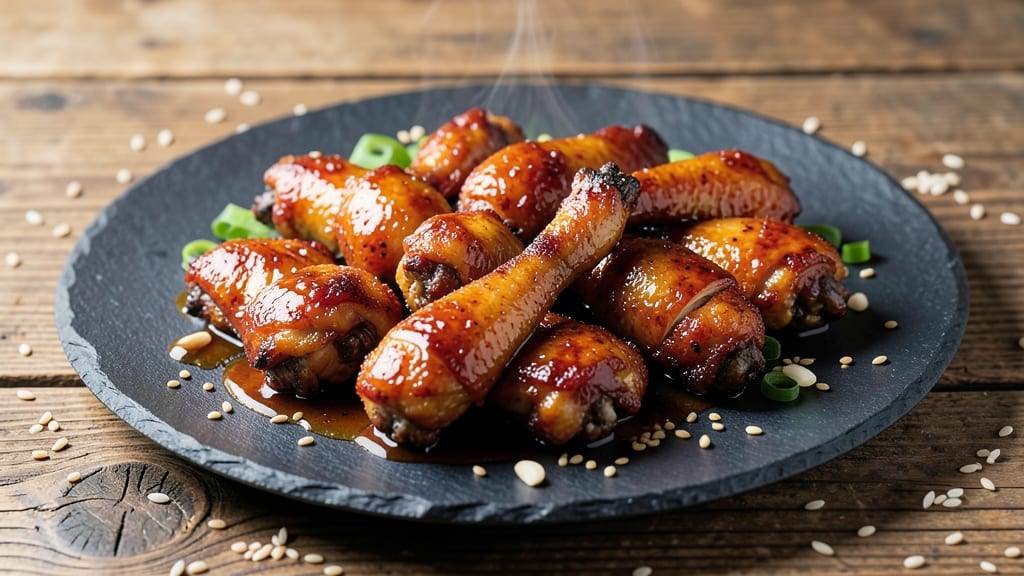
This baked teriyaki chicken wings recipe delivers restaurant-quality crispy edges and glazed sweetness without deep-frying. The secret lies in a precise balance of marinating time and high-heat baking—transforming simple wings into a dish that's crispy, sticky, and packed with umami.
I've perfected this method over countless batches, ensuring every wing achieves that perfect contrast of textures and flavors.
The process starts with a flavorful marinade that tenderizes the chicken while infusing it with teriyaki's signature sweet-savory profile. After baking, the wings develop a golden-brown crust that shatters with each bite, while the teriyaki glaze caramelizes into a sticky, slightly tacky finish.
No deep-fryer? No problem—this method achieves crispiness through careful baking techniques and a simple cornstarch coating.
What you'll end up with is a plate of wings that's equally impressive as a weeknight dinner or game-day spread. The crispy edges provide satisfying texture, while the teriyaki glaze adds a sweet, tangy contrast that keeps every bite exciting.
The best part? These wings stay crispy even after reheating, making them perfect for meal prep.
Serve with classic accompaniments like ranch or blue cheese dressing for cooling contrast, or pair with sesame-ginger slaw for a fresh crunch. The recipe scales effortlessly, whether you're feeding a crowd or treating yourself to a solo indulgence. Ready to make wings that'll have everyone asking for the recipe?
Ingredients for baked teriyaki chicken wings
These ingredients transform simple wings into restaurant-quality teriyaki perfection—crispy, sticky, and packed with umami.
| Ingredient | Amount | Notes |
|---|---|---|
| Chicken Wings 🍗 | 2 lb | Split into drumettes and flats |
| Cornstarch 🌾 | ½ cup | For crispy coating |
| Sesame Oil 🫒 | 1 tbsp | For authentic flavor |
| Soy Sauce 🍶 | ½ cup | Low-sodium preferred |
| Honey 🍯 | ⅓ cup | Wildflower for depth |
| Garlic Cloves 🧄 | 4 cloves | Minced for marinade |
| Fresh Ginger 🌿 | 1 tbsp | Grated, aromatic |
| Rice Vinegar 🍶 | ¼ cup | For tangy balance |
| Sesame Seeds 🌰 | 1 tbsp | Toasted for garnish |
| Green Onions 🧅 | 2 whole | Sliced for garnish |
| Salt 🧂 | 1 ½ tsp | Diamond Crystal preferred |
| Black Pepper 🌶️ | ½ tsp | Freshly cracked |
| Vegetable Oil 🫒 | 1 tbsp | For tossing wings |
The chicken wings are the star—look for bone-in, skin-on for maximum flavor and crispiness. Costco or Trader Joe's have the best quality at reasonable prices. Split the wings into drumettes and flats for even cooking. The cornstarch is non-negotiable for that signature crispy texture, so grab a box of Bob's Red Mill if you're serious about restaurant-quality results. Fresh ginger and garlic make all the difference, so don't substitute with powdered versions. For the sesame oil, Kadoya is my go-to—it's worth the investment for that authentic aroma.
No sesame oil? Toasted sesame seeds plus a touch of peanut oil works in a pinch. Low-sodium soy sauce is ideal, but regular soy sauce works too—just add an extra pinch of salt. Honey substitutes? Maple syrup or agave both work, though honey adds that perfect floral note. The rice vinegar can be swapped for apple cider vinegar, but it won't have quite the same depth. For the cornstarch coating, arrowroot powder is a 1:1 substitute. Pro tip: Toss the wings in cornstarch twice—once before baking and once after the initial marinade—for maximum crispiness. And trust me, toasted sesame seeds on top are worth the extra minute.
Marinate the wings for at least 4 hours—overnight is even better. Store the marinade in an airtight container in the fridge for up to 5 days. The baked wings stay crispy for 3-4 days in the fridge, but reheat them at 375°F for 5-7 minutes to restore that perfect crunch. Freeze cooked wings for up to 3 months—just thaw in the fridge overnight before reheating. These wings reheat beautifully, making them perfect for meal prep. Garnish with sesame seeds and green onions right before serving to keep everything fresh.
Why You'll Love This Recipe
- I’ll be real: chicken wings aren’t cheap, but this recipe stretches them far. The cornstarch keeps them crispy without deep-frying, and the teriyaki sauce (just soy, honey, and a splash of water) costs pennies. Plus, the leftovers taste just as good cold in a wrap the next day.
- One-Pan Magic: Honestly, I swear by this recipe—just toss the wings in cornstarch, drizzle with sesame oil and soy sauce, and let the oven do the work. No messy marinades or extra bowls; the honey caramelizes right on the sheet pan while you’re still deciding what to watch on TV.
- Sweet-Savory Crunch: That crispy skin with the sticky-sweet teriyaki glaze? It’s the kind of bite that makes people pause mid-conversation. The soy and honey balance perfectly, and the sesame oil adds this nutty depth that turns "snack" into "I need more."
- Game for Any Gathering: Between us, these wings work for everything—weeknight dinners, game day, or even as a last-minute appetizer when friends drop by. Double the batch, and you’ve got leftovers for lunch the next day (trust me, they reheat beautifully).
Step-by-step instructions for baked teriyaki chicken wings
Here's how to achieve that perfect balance of crispy, caramelized edges and sticky-sweet teriyaki glaze.
Prepare the Wings for Maximum Crispiness
Preheat your oven to 425°F with a wire rack placed inside a rimmed baking sheet. This setup ensures crispy skin by allowing hot air to circulate underneath the wings. Pat the 2 lb chicken wings completely dry with paper towels—moisture is the enemy of crispy edges. You're aiming for wings that look like they've been rubbed with a towel until they're bone dry.
In a large bowl, toss the dry wings with 1.5 tsp salt and 0.5 tsp black pepper. Then add 0.5 cup cornstarch and toss again until every wing is evenly coated. The cornstarch creates a crispy barrier that locks in juices while forming that perfect crunch. Let the seasoned wings sit for 10 minutes at room temperature—this helps them cook more evenly in the oven.
Create the Signature Teriyaki Glaze
While the oven preheats, combine 0.5 cup soy sauce, 0.33 cup honey, 0.25 cup rice vinegar, 1 tbsp sesame oil, 4 cloves minced garlic, and 1 tbsp grated fresh ginger in a small saucepan. Bring this mixture to a gentle simmer over medium heat, then reduce to low heat and let it cook for 5-6 minutes until slightly thickened.
Here's the thing—you want the glaze to coat the back of a spoon but still be pourable. Taste it and adjust seasoning if needed; I usually add a pinch more salt or a splash of vinegar for balance. The aroma alone should make your mouth water. Once thickened, remove from heat and let it cool for 5 minutes—this prevents the wings from steaming when you add the hot glaze later.
Bake for Crispy Perfection
Arrange the cornstarch-coated wings on the wire rack in a single layer, leaving ½-inch between each piece. This spacing ensures even browning and crisping. Drizzle 1 tbsp vegetable oil over the wings and use your hands to toss them gently, ensuring they're lightly coated. Bake for 25 minutes until the edges turn deep golden brown and the internal temperature reaches 165°F.
I know it's tempting to peek, but resist! Every time you open the oven door, you lose 25°F of heat and add 5 minutes to your cook time. The wings are done when they're crispy to the touch and the skin has that irresistible mahogany color. If they're browning too quickly, tent with foil for the last 5 minutes to prevent burning.
Glaze and Finish with Flavor Boosters
Remove the wings from the oven and transfer them to a large bowl. Pour the cooled teriyaki glaze over the wings, tossing gently to coat them evenly. Let them sit for 5 minutes—this allows the glaze to penetrate slightly and develop that sticky-sweet exterior we love. Then return the wings to the oven for 3-5 minutes to set the glaze and deepen the caramelization.
While they finish, slice the 2 whole green onions and toast the 1 tbsp sesame seeds in a dry skillet over medium heat for 1-2 minutes until fragrant. The seeds should smell nutty and warm. Once the wings are back in the oven, they'll be ready when the glaze is glossy and the edges are deep golden brown again.
Garnish and Serve Immediately
Transfer the glazed wings to a serving platter and sprinkle with the toasted sesame seeds and sliced green onions. The contrast of textures—crispy wings, sticky glaze, crunchy seeds, and fresh green onions—is what makes this dish extraordinary. Serve immediately while the wings are piping hot and the glaze is still glossy.
Each bite should deliver that perfect combination of crispy, caramelized edges with tender, juicy meat underneath, all wrapped in that sweet-savory teriyaki embrace. The wings should hold their shape but still be easy to pick up—no soggy or undercooked pieces. Pair with steamed rice and a simple cucumber salad for the ultimate teriyaki feast.
Pro Tips For Making Baked Teriyaki Chicken Wings
- Pat the Wings Dry: Skip the paper towels—use a clean kitchen towel to wipe them down. Wet wings steam instead of crisp up, and that’s a dealbreaker for teriyaki. I learned this the hard way after baking soggy, sad wings that looked like they’d been boiled in their own juices.
- Use Cornstarch Like Glue: Toss the wings in cornstarch before tossing in the teriyaki glaze. It sticks to the skin like crazy, creating that perfect crispy crust. I used to add it later, and the coating always felt half-hearted—this method guarantees a proper crunch.
- Bake in Two Batches: Crowding the tray turns your wings into a greasy mess. Bake them in single layers, even if it means two trips to the oven. The extra time pays off—golden, evenly cooked wings every time. (Yes, even if you’re impatient like me.)
- Finish with Sesame Oil: Drizzle sesame oil over the wings after baking, not before. Heat it up for 30 seconds—just until it smells nutty. This adds real depth without burning the flavor. I was skeptical until I tried it, and now it’s non-negotiable.
Pro cooking tips for great baked teriyaki chicken wings
Oven Temp Control
Your oven's accuracy is everything—calibrate it before starting. Most home ovens run 25°F hotter than set, so if you dial 425°F, it's actually 450°F. I use an Oven Thermometer from Thermoworks to verify—place it on the middle rack while preheating.
For even crispiness, position a wire rack over a baking sheet to allow airflow underneath the wings. This creates a crispy skin while keeping the meat juicy. 🌡️
Double Cornstarch Coat
The secret to restaurant-style crispiness is coating the wings twice. After patting them dry, toss with 0.5 cup cornstarch first, let sit for 10 minutes, then toss again right before baking. This double layer prevents moisture from escaping and creates that shatteringly crisp exterior.
I use Bob's Red Mill cornstarch—it's fine and absorbs perfectly. For extra insurance, chill the wings in the fridge for 30 minutes before baking to firm up the coating.
Glaze Timing Matters
Don't rush the glaze—let it cool for 5 minutes after thickening before tossing with wings. Hot glaze will steam the wings instead of caramelizing, making them soggy. I also recommend thinning the glaze slightly with 1 tsp water before tossing for even coverage.
For that signature glossy finish, return the wings to the oven for 3-5 minutes after glazing to set the sauce while keeping it sticky. 🍯
Resting Prevents Dryness
After baking, let the wings rest for 5 minutes before glazing. This allows juices to redistribute, preventing dry meat when you add the sauce. I also recommend resting them another 5 minutes after glazing before serving.
This two-step resting ensures tender, juicy wings with crispy edges that don't fall apart when you bite in. Trust me, skipping this step makes all the difference in texture.
Garnish at the Last Minute
Toast your sesame seeds and slice green onions right before serving—they lose freshness and crunch if prepped too early. I like to toast seeds in a dry skillet over medium heat for 1-2 minutes until fragrant.
The aroma alone makes these wings taste more gourmet. For extra flavor, sprinkle with a pinch of flaky sea salt like Maldon—it enhances the teriyaki's sweetness without overpowering.
Reheating for Crispiness
To revive crispiness, reheat wings at 375°F for 5-7 minutes on a wire rack (no baking sheet). This prevents steaming and restores that golden crunch. For extra insurance, brush with a tiny bit of neutral oil before reheating.
I find these wings stay crispy for 3-4 days in the fridge when stored properly in an airtight container. Freeze cooked wings for up to 3 months—thaw overnight in the fridge before reheating.
Nutrition facts
Frequently asked questions
Can I use frozen chicken wings for this recipe?
Yes, but thaw them completely first! Place frozen wings in a sealed bag and submerge in cold water for 20-30 minutes or thaw overnight in the fridge. Pat them completely dry before seasoning—any excess moisture will prevent crispiness. For best results, let them sit at room temperature for 10 minutes after thawing to ensure even cooking.
How do I make the teriyaki glaze thicker or thinner?
For a thicker glaze, simmer the sauce for an extra 2-3 minutes or add 1 tsp cornstarch mixed with 1 tbsp water at the end. Need it thinner? Add 1 tsp water or rice vinegar at a time until it reaches your desired consistency. The glaze should coat the back of a spoon but still be pourable for even coating on wings.
Why did my wings turn out soggy instead of crispy?
Soggy wings usually happen from one of three things: not patting them dry enough, overcrowding in the oven, or adding hot glaze too soon. Double-check that your wings are completely dry before seasoning, leave ½-inch between each piece on the rack, and let the glaze cool for 5 minutes before tossing. Also, avoid tenting with foil too early—let the skin crisp first!
Can I bake these wings in an air fryer instead?
Preheat your air fryer to 400°F and cook the wings in batches for 12-15 minutes, shaking halfway through. Toss with cornstarch and oil as directed, then glaze after the initial cook. Air fryers work great for crispy wings—just watch them closely to avoid burning. The glaze step remains the same for that sticky-sweet finish.
What's the best way to store leftovers?
Store cooked wings in an airtight container in the fridge for up to 4 days. To maintain crispiness, reheat at 375°F for 5-7 minutes on a wire rack (no baking sheet). For longer storage, freeze wings for up to 3 months. Thaw overnight in the fridge before reheating—never microwave frozen wings directly.