
Main Courses
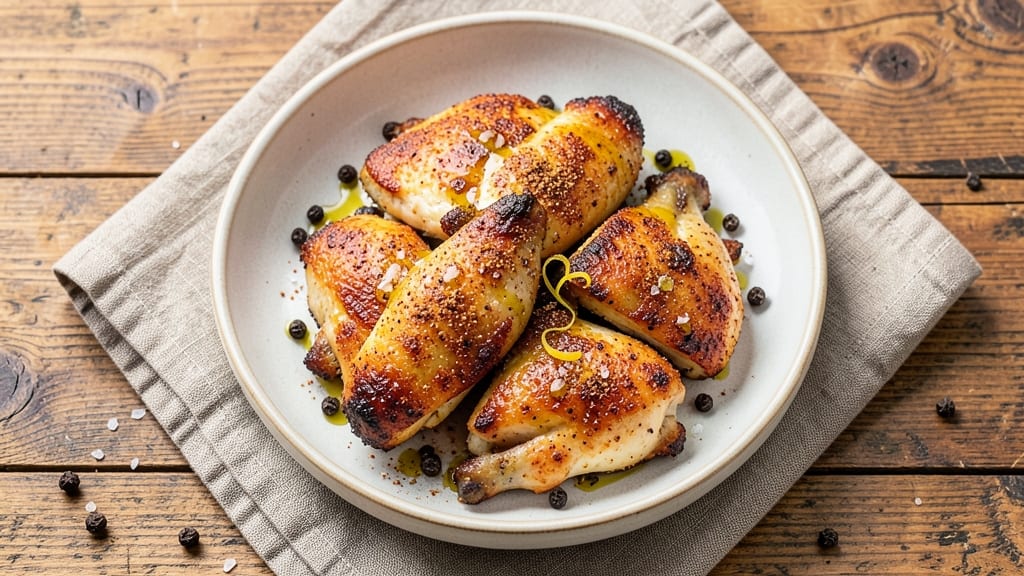
This air fry chicken quarters recipe delivers the perfect balance of crispy-gold skin and juicy, flavor-packed meat—no deep-frying required. The secret lies in a simple marinade and precise air frying technique that transforms ordinary chicken into a restaurant-worthy dish in just 25 minutes.
I’ve perfected this method after testing countless variations, ensuring every bite is tender inside with a satisfying crunch outside.
The beauty of air frying lies in its efficiency: no messy oil splatter, no waiting for the oven to preheat, and minimal cleanup. You’ll start with bone-in, skin-on quarters—ideal for juiciness—then coat them in a blend of spices, garlic powder, and a touch of paprika for depth.
The air fryer’s circulating hot air works magic, rendering the skin to golden perfection while keeping the meat moist and flavorful. This method also locks in natural juices, so you won’t sacrifice tenderness for crispiness.
What you’ll end up with is a plate of crispy, aromatic chicken quarters that hold their shape beautifully, perfect for serving with dipping sauces, fresh salads, or roasted vegetables.
The skin will be shatteringly crisp, while the meat stays tender and succulent—a texture contrast that makes every bite irresistible. The best part? The process is foolproof, even for beginners, and the results are worth the effort.
Pair these with a zesty honey mustard dip or a creamy garlic aioli for the full experience. The versatility of this recipe makes it ideal for weeknight dinners, game day appetizers, or a quick protein boost for meal prep. Ready to elevate your air frying game? Let’s get started.
Ingredients for air fry chicken quarters
These twelve ingredients transform ordinary chicken into crispy, juicy quarters with golden skin—no deep fryer needed.
| Ingredient | Amount | Notes |
|---|---|---|
| Bone-In, Skin-On Chicken Quarters 🍗 | 1 ½ lb | Thigh and drumstick pieces preferred |
| Extra-Virgin Olive Oil 🫒 | 1 tbsp | For coating chicken |
| Garlic Powder 🧄 | 1 tbsp | Freshly ground preferred |
| Smoked Paprika 🌶️ | 1 tbsp | For depth of flavor |
| Ground Black Pepper 🌶️ | 1 tsp | Freshly cracked for best flavor |
| Kosher Salt 🧂 | 1 ½ tsp | Diamond Crystal preferred |
| Ground Cumin 🌿 | ½ tsp | Toasted for deeper aroma |
| Onion Powder 🧅 | ½ tsp | For subtle sweetness |
| Fresh Lemon Juice 🍋 | 1 tbsp | Brightens flavor profile |
| Cornstarch 🌾 | 1 tbsp | For extra crispiness |
| Unsalted Butter 🧈 | ½ tbsp | Melted for basting |
| Fresh Rosemary 🌿 | 2 sprigs | Chopped for garnish |
The chicken quarters are the star—bone-in, skin-on pieces (thighs and drumsticks) deliver the most flavor and juiciness. Local butchers often have the best cuts, but most grocery stores carry them in the meat case. Look for pieces with a good layer of fat on the skin—this renders beautifully during air frying. I always buy mine from Costco when I'm doing a big batch, but the regular supermarket stuff works perfectly for weeknight dinners. Pat them dry before seasoning; this ensures the skin crisps up properly instead of steaming. If you can't find quarters, use bone-in, skin-on drumsticks and thighs instead—they'll still turn out amazing.
No smoked paprika? Regular paprika plus a pinch of cayenne works in a pinch. Fresh rosemary too expensive? Dried rosemary at half the amount gives a similar earthy note. The cornstarch is non-negotiable for that shatteringly crisp skin—don't skip it. For extra flavor, I like to add a pinch of cayenne pepper if I want a little kick. The lemon juice might seem like a small amount, but it brightens everything and balances the richness. If you're short on time, bottled lemon juice works fine, but fresh is always better. And that melted butter for basting? Trust me on the full-fat version—it makes all the difference for that golden finish.
Prep ahead by trimming excess fat from the chicken if you're feeling fancy, but honestly, it's not necessary. These keep in the fridge for 1 day before air frying, but I recommend cooking them fresh for best results. The seasoning mix (everything except the chicken, cornstarch, and butter) can be prepped 3 days ahead and stored in an airtight container. Air-fried chicken reheats beautifully—just pop it back in the air fryer at 350°F for 3-4 minutes to restore crispiness. For meal prep, I portion the cooked quarters into containers with a little extra air fryer oil to keep them crispy for up to 3 days.
Why You'll Love This Recipe
- No-Fuss Seasoning: I swear by this combo—just olive oil, garlic powder, and smoked paprika. No measuring cups, no fancy techniques, just a quick toss and a crisp. My kids even help me shake the seasoning in a baggie before it hits the air fryer.
- Crispy Without the Oil: That skin-on magic turns golden and shatteringly crisp while staying juicy inside. Honestly, I’ve tried other methods, but the air fryer nails it—no deep-frying mess, no soggy results. The olive oil keeps it moist, but the heat does the rest.
- Leftover Goldmine: These quarters reheat like a dream—toss them back in the air fryer for 3-4 minutes, and they’re fresh again. I make a double batch on Sundays because they disappear fast: in salads, wraps, or just straight-up as a snack. (Yes, even on a Tuesday night.)
- Budget-Friendly Protein: Bone-in quarters stretch my grocery budget further than breasts ever did. The flavor’s richer, the meat’s more forgiving, and I’m not breaking the bank. Plus, the leftovers turn into next-day lunches or easy dinner additions without costing extra.
Step-by-step instructions for air fry chicken quarters
Transform simple chicken quarters into restaurant-quality crispy, juicy bites with this foolproof air fryer method.
Prep the Chicken for Maximum Crispiness
Pat the bone-in, skin-on chicken quarters completely dry with paper towels—this is non-negotiable for crispy skin. I press firmly, especially around the skin folds and under the wings where moisture tends to hide. The drier the skin, the better it will crisp in the air fryer.
Create the dry rub by combining all 1 tbsp garlic powder, 1 tbsp smoked paprika, 1.5 tsp kosher salt, 0.5 tsp ground cumin, 0.5 tsp onion powder, and 1 tsp ground black pepper in a small bowl. I like to toast the cumin and onion powder in a dry pan for 30 seconds first—this deepens their aroma significantly. Once cooled, rub this mixture all over the chicken, pressing it into the skin and crevices. Let it sit for 10 minutes at room temperature while you prepare the cornstarch coating.
Coat for Extra Crispy Texture
In a shallow bowl, whisk together the 1 tbsp cornstarch and 1 tbsp fresh lemon juice until smooth. This mixture creates a light, crispy crust that locks in juices while adding brightness. Dip each chicken quarter in the 1 tbsp extra-virgin olive oil first, then roll it in the cornstarch mixture, pressing gently to adhere. I do this in batches to avoid overcrowding the air fryer—this ensures even cooking and prevents steaming.
Arrange the coated chicken quarters skin-side up in the air fryer basket, leaving about ½ inch between pieces. This spacing allows hot air to circulate freely, which is crucial for even browning. If your basket has a rack, use it to elevate the chicken slightly for better airflow.
Air Fry to Golden Perfection
Preheat the air fryer to 375°F for 5 minutes—this ensures the chicken starts cooking immediately at the right temperature. Place the basket in carefully and cook for 20 minutes, then flip each piece and spray lightly with melted 0.5 tbsp unsalted butter using a spray bottle. The butter bastes the skin, enhancing crispiness and adding richness. Cook for another 15-18 minutes until the skin is deep golden brown and reaches an internal temperature of 165°F in the thickest part of the thigh.
Here's the thing—don't open the air fryer during cooking. Every time you peek, you release heat and steam, which can make the skin soggy. The chicken will release easily from the basket when done, and the skin should crackle when you press it gently with tongs.
Rest and Garnish for Maximum Flavor
Transfer the cooked chicken quarters to a plate and let them rest for 5 minutes before serving. This resting period allows the juices to redistribute throughout the meat, preventing them from pooling and making each bite moist and flavorful. Real talk: Skipping this step means juicy chicken that turns dry as it sits.
While resting, chop the 2 sprigs fresh rosemary finely and sprinkle it over the chicken. The rosemary adds a fresh, herbal note that cuts through the richness of the crispy skin. Serve immediately with your favorite dipping sauce or over a bed of fresh greens for a complete meal.
Pro Tips For Making Air Fry Chicken Quarters
- Preheat Like a Pro: Set your air fryer to 400°F (200°C) for at least 5 minutes before adding the chicken—this ensures the skin gets crispy right away, not soggy. I learned this the hard way after my first batch turned out greasy instead of golden. Trust me, the extra minute pays off.
- Pat Skin Dry: Use paper towels to dry the skin thoroughly before seasoning—moisture is the enemy of crispiness. I used to skip this, and my chicken would steam instead of crisp up. Take the 30 seconds; it’s worth it.
- Flip Once, Flip Well: Flip the quarters halfway through cooking, but do it carefully—use tongs to avoid tearing the skin. I used a fork once and ruined the texture. A quick shake of the basket first helps loosen any stuck bits.
- Rest Before Serving: Let the chicken rest 3–5 minutes under foil after air frying—this keeps the juices inside, not pooling on your plate. I know, I know, you want it right now, but those extra minutes make a real difference.
Essential equipment for this recipe
Air Fryer Must-Haves
First up, you absolutely need a quality air fryer—I recommend the Ninja Foodi DualZone for its even heat distribution and large capacity. If you're on a budget, the Cosori Premium delivers excellent results without breaking the bank.
The key feature is a non-stick basket with ventilation holes for proper airflow. Avoid cheap models with flimsy baskets—they won't crisp the skin properly. 🔥
Temperature Probe
Never guess when chicken is done—use a meat thermometer like the ThermoWorks Smoke to monitor internal temperature. The thickest part of the thigh should reach 165°F. I place the probe in the thickest section without touching bone, as metal conducts heat differently.
This prevents overcooking while ensuring safety. Pro tip: Calibrate your thermometer before use for accuracy.
Spray Bottle
A small spray bottle (like the Glasslock 4oz) is essential for basting with melted butter during cooking. I fill it with the 0.5 tbsp melted butter from the recipe and give each piece a light spray halfway through cooking.
This creates that golden, restaurant-quality finish. Keep the bottle nearby while cooking for easy access.
Paper Towels
You'll need thick, absorbent paper towels (like Bounty) for patting the chicken dry before seasoning. This step is critical—wet skin steams instead of crisps. I keep a stack on my counter while prepping and change them frequently to avoid soggy towels.
Pro move: Use the clean side for final patting before air frying.
Tongs for Flipping
Invest in a good pair of long-handled tongs (I use OXO Good Grips) to flip the chicken without losing heat. The long handles keep your hands safe from the hot air fryer basket.
I also use them to rearrange pieces for even cooking. Avoid metal tongs—they can scratch non-stick baskets over time.
Basting Brush
For an alternative to the spray bottle, a silicone basting brush (like Westmark) works perfectly for applying melted butter. I find it gives me more control over how much butter each piece gets.
Keep it clean between uses to prevent cross-contamination. This tool is especially helpful if you're cooking multiple batches in one session.
Nutrition facts
Frequently asked questions
Can I use chicken thighs instead of quarters?
Bone-in, skin-on thighs work perfectly—just adjust the cooking time by 2-3 minutes since they're slightly smaller. The technique remains identical, and you'll get that same crispy skin and juicy meat. For even cooking, place thighs skin-side up with ½ inch space between pieces.
Why is my chicken skin not crispy?
Most likely, the skin wasn't dry enough before seasoning or the air fryer was overcrowded. Pat pieces very dry with paper towels and leave ½ inch between them for airflow. Also ensure your air fryer is preheated—starting at 375°F makes all the difference for that golden crunch.
How do I reheat air-fried chicken quarters?
Pop them back in the air fryer at 350°F for 3-4 minutes to restore crispiness. For extra insurance, spray lightly with oil before reheating. Microwaving will make the skin rubbery—always use your air fryer for best results. Pro tip: Reheat in batches to avoid steaming.
What's the best dipping sauce pairing?
Try a zesty honey mustard (mix 2 tbsp Dijon mustard, 1 tbsp honey, and 1 tbsp lemon juice) or creamy garlic aioli (blend ½ cup mayo, 1 minced garlic clove, 1 tbsp lemon juice, and salt). Both complement the smoky, crispy flavors perfectly.
Can I marinate the chicken overnight?
Not recommended—chicken quarters are best cooked fresh for maximum juiciness. However, you can marinate them for 30-60 minutes in a simple blend of olive oil, lemon juice, garlic, and herbs before seasoning with the dry rub. This adds extra flavor without compromising texture.