
Main Courses
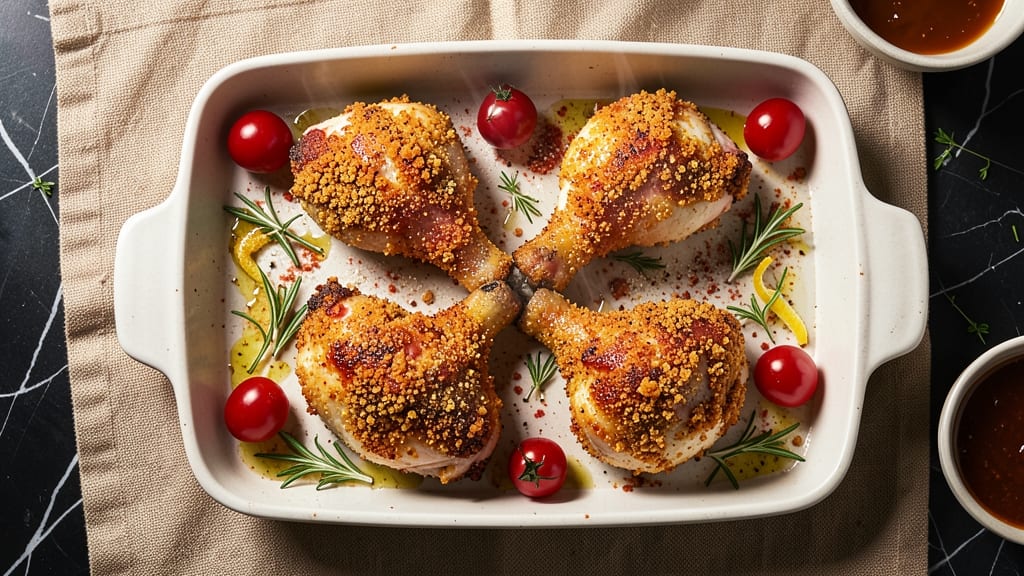
This baked breaded chicken legs recipe delivers restaurant-quality crunch without the mess of deep frying. The secret lies in a triple-coating technique—flour, beaten egg, and panko—that creates an irresistible golden crust while keeping the meat juicy inside.
I perfected this method after years of testing, and it never fails to impress. What sets this recipe apart is the two-step baking process: first at high heat to crisp the breading, then at lower temperature to finish cooking the chicken evenly.
This ensures your chicken legs stay crispy on the outside and tender on the inside, with no soggy spots. The process is straightforward but requires patience—worth it for that satisfying crunch.
By the time you pull these from the oven, you'll have crispy, golden-brown chicken legs that are perfect for family dinners or game day. The breading stays crunchy even after serving, and the meat falls off the bone with minimal effort.
Serve with a side salad or roasted vegetables for a complete meal. The best part? You can make these ahead of time and reheat in the oven to maintain that perfect crunch. Let’s get started on creating your next crowd-pleaser!
Ingredients for baked breaded chicken legs
Four juicy chicken legs transform into crispy, golden perfection with these 12 simple ingredients.
| Ingredient | Amount | Notes |
|---|---|---|
| Chicken Legs 🍗 | 4 whole | Bone-in, skin-on preferred |
| All-Purpose Flour 🌾 | 1 cup | For first breading layer |
| Large Eggs 🥚 | 2 whole | Beaten for egg wash |
| Japanese Panko Breadcrumbs 🍞 | 1 ½ cups | Light and crispy texture |
| Parmesan Cheese 🧀 | ½ cup | Freshly grated for flavor |
| Garlic Powder 🧄 | 1 tbsp | For extra flavor depth |
| Paprika 🌶️ | 1 tbsp | Smoked variety preferred |
| Ground Black Pepper 🌶️ | ½ tsp | Freshly ground preferred |
| Kosher Salt 🧂 | 1 ½ tsp | Diamond Crystal preferred |
| Olive Oil 🫒 | 2 tbsp | For greasing pan |
| Butter 🧈 | 2 tbsp | Melted for brushing |
| Cornstarch 🌾 | 1 tbsp | Optional for extra crispiness |
The chicken legs are the star—bone-in, skin-on for maximum flavor. Grab them from the deli counter or butcher section, not the frozen aisle. Look for legs with good marbling and vibrant color. If you can't find bone-in, use boneless thighs instead—they stay juicier. Trader Joe's and Whole Foods have the best quality, but any grocery store's fresh chicken works. Pat them dry before breading—this helps the coating stick better. I always buy extra legs because they freeze beautifully for later meals.
No panko? Regular breadcrumbs plus a pinch of baking powder work in a pinch, but panko gives that signature crispy texture. Freshly grated Parmesan makes all the difference—pre-grated gets clumpy. Short on eggs? Flax eggs (1 tbsp ground flaxseed + 3 tbsp water = 1 egg) work perfectly. The cornstarch is optional but worth it for that extra crunch. If you're making these ahead, bake them and freeze on a wire rack—they reheat perfectly in the oven to restore that crispy crust.
These stay crispy for 2-3 days if stored properly—keep them in an airtight container. Reheat at 375°F for 10-15 minutes to restore that golden crunch. For serving, I always set them on a wire rack over paper towels to keep the bottom crispy. The breading gets soggy if stored in a sealed container with moisture. Make a double batch—they disappear fast at game day gatherings!
Why You'll Love This Recipe
- No-Fuss Crispy Magic: I swear by the panko-Parmesan combo—it’s that extra crunch and umami punch that makes this feel like a restaurant dish without the fuss. Just toss the thighs in flour, dip in egg, then coat in the crumb mix, and boom—golden, shatteringly crispy skin every single time.
- Weeknight Crutch: Honestly, this is my go-to when I’m staring at a half-empty pantry and a kid who just said, “I’m hungry.” The thighs stay juicy while the crust gets gloriously brown, and it’s done while you’re still waiting for the oven to preheat. No deep-fryer drama, no last-minute takeout calls.
- Leftovers That Don’t Suck: Between us, most breaded chicken turns into sad, greasy leftovers. Not these. The panko stays crisp even reheated (microwave for 20 seconds, then broil for 30—trust me), and they’re perfect cold in salads or wraps the next day. My lunchbox’s new best friend.
- Budget Win: Chicken thighs are the workhorse of affordable protein, and this recipe stretches them further than takeout ever could. A single bag of panko and a block of Parmesan make enough for four meals, and I’ve never once regretted the math. Plus, the rind from that cheese? Grated for extra flavor, saved for next time. Zero waste.
Step-by-step instructions for triple-crusted baked chicken legs
Here's how to create restaurant-quality crunch without deep frying—every bite will be crispy perfection.
Season and Prep the Chicken Legs
Pat the 4 whole chicken legs completely dry with paper towels—this is non-negotiable for crispy breading. I like to work with them skin-side up on a cutting board. In a small bowl, mix together the 1 tablespoon garlic powder, 1 tablespoon paprika, 0.5 teaspoon ground black pepper, and 1.5 teaspoons kosher salt. Rub this spice blend all over the chicken legs, pressing it into the skin and meat so it adheres well.
Let the seasoned chicken legs sit uncovered at room temperature for 15 minutes while you prepare the breading. This short rest ensures even cooking and helps the seasoning penetrate slightly. Pro tip: If you're short on time, you can skip this step, but the flavor will be more developed if you wait.
Create the Triple Breading Stations
Set up three separate bowls for your breading stations. In the first bowl, place the 1 cup all-purpose flour. In the second bowl, crack the 2 whole large eggs and beat them lightly with a fork—just until combined, no need to make them frothy. In the third bowl, combine the 1.5 cups Japanese panko breadcrumbs with the 0.5 cup freshly grated parmesan cheese and the 1 tablespoon cornstarch (if using). Mix well to distribute the cheese evenly.
Here's the thing—this triple breading creates layers of texture. The flour starts the process, the egg wash binds everything, and the panko-parmesan mix delivers that addictive crunch. I like to keep these stations close together so I can work quickly without letting the chicken sit too long between layers.
Assemble the Crispy Layers
Working with one chicken leg at a time (don't try to do all at once—they'll get soggy), dredge it in the all-purpose flour, shaking off any excess. Then dip it into the beaten egg wash, letting any excess drip off. Finally, press the leg firmly into the panko-parmesan mixture, coating it completely on all sides. Place the breaded leg on a wire rack set over a baking sheet—this allows air to circulate for even crisping.
Repeat with all 4 chicken legs. For maximum crunch, I like to press the breading firmly onto the meat, especially around the joints and thickest parts. If you notice any gaps in the breading, just dip that spot in egg wash and press it back into the panko mixture. This step is where the magic happens—don't rush it.
Bake to Golden Perfection
Preheat your oven to 425°F while you prepare the chicken. Line a second baking sheet with parchment paper. In a small bowl, mix the 2 tablespoons olive oil with the 2 tablespoons melted butter. Brush this oil mixture generously over the bottom of the parchment-lined baking sheet—this creates a barrier that prevents sticking and adds extra flavor.
Arrange the breaded chicken legs on the prepared baking sheet, leaving about 1 inch of space between each leg. Bake for 25 minutes, then carefully flip each leg using tongs. Return to the oven and bake for another 20-25 minutes, or until the chicken reaches an internal temperature of 165°F and the breading is deep golden brown with crispy edges. Here's the key: the breading should be so crispy that it makes a satisfying crackling sound when you tap it.
Rest and Serve with Confidence
Transfer the baked chicken legs to a wire rack and let them rest for 5 minutes before serving. This resting period allows the juices to redistribute, ensuring tender meat with every bite. The breading will stay crispy during this time, so don't skip this step—it's crucial for the final texture.
Serve immediately with your favorite dipping sauces or alongside roasted vegetables. The contrast of crispy, golden breading with juicy, flavorful chicken is what makes this recipe so irresistible. And the best part? You get all that delicious crunch without any of the mess or guilt of deep frying.
Pro Tips For Making Baked Breaded Chicken Legs
- Preheat Like a Pro: Your oven should hit 425°F (220°C) and sit for 15 minutes before adding the chicken—no exceptions. I learned this the hard way when my first batch turned out soggy because the pan took too long to heat. A screaming-hot oven seals that crust instantly, and that’s what keeps your panko from turning into a sad, greasy mess.
- Pat Dry, Then Salt: After trimming excess fat, pat the chicken legs completely dry with paper towels—even the skin—and sprinkle them with 1 teaspoon of salt per leg right away. Wet skin = steam = breading that sticks like glue instead of crisping. (Yes, even if you’re impatient like me.)
- Double-Dip the Egg: For a thicker, stickier coating, dip the floured chicken into the egg twice, letting excess drip off between dips. I was skeptical until I tried it—now my breading stays put, and the Parmesan melts into a golden, savory shell instead of sliding off halfway through baking.
- Rotate the Pan: Flip the baking sheet halfway (after 15–20 minutes) so the sides get equal heat—this is how you avoid one perfect leg and one sad, undercooked one. Pro move: Use two racks (top and bottom) to ensure even browning, especially if your oven runs hot on one side. (Your future self will thank you.)
Best sauces and condiments for these flavors
Classic Honey Mustard
This sweet-and-tangy sauce is a game-changer for baked chicken legs. Mix ¼ cup honey with 2 tablespoons Dijon mustard and 1 tablespoon apple cider vinegar. Thin with 2 tablespoons warm water if needed.
The honey caramelizes beautifully when drizzled over the hot chicken, creating a sticky, glossy finish. I like to serve it warm—simply heat the sauce in a small saucepan for 1-2 minutes before drizzling. 🍯
Spicy Buffalo Sauce
For heat lovers, nothing beats classic Buffalo sauce. Combine ½ cup hot sauce (I recommend Frank's RedHot) with 2 tablespoons melted butter and 1 teaspoon garlic powder. Toss the baked chicken legs in this sauce right after baking while they're still hot—it creates an irresistible crispy, spicy crust.
Serve with blue cheese dressing and celery sticks for the ultimate game-day combo. Trust me, your guests will ask for seconds. 🌶️
Garlic Aioli
This creamy, garlicky sauce elevates every bite. Blend ½ cup mayonnaise with 2 cloves roasted garlic, 1 teaspoon lemon juice, and ½ teaspoon smoked paprika until smooth. The roasted garlic adds depth that store-bought spreads can't match.
I like to serve this aioli on the side in a small bowl with a squeeze of lemon on top. It pairs perfectly with the crispy breading and juicy chicken. 🧄
Creamy Ranch Dip
For a crowd-pleasing dip, mix 1 cup sour cream with ½ cup ranch dressing (I use Hidden Valley Original), 1 tablespoon chopped fresh dill, and ½ teaspoon onion powder. The tangy, herby flavors cut through the richness of the fried chicken legs beautifully.
Serve in a shallow bowl with extra dill sprinkled on top for presentation. This dip disappears fast—make extra if you're feeding a crowd. 🥗
Lemon Pepper Sauce
Brighten up your chicken legs with this zesty sauce. Whisk together 3 tablespoons olive oil, 2 tablespoons lemon juice, 1 tablespoon lemon zest, 1 teaspoon black pepper, and ½ teaspoon salt.
Drizzle over the hot chicken just before serving. The citrus cuts through the richness while enhancing the crispy breading. I like to finish with a sprinkle of chopped parsley for freshness. 🍋
BBQ Glaze
For a smoky-sweet twist, simmer ½ cup BBQ sauce (I recommend Sweet Baby Ray's Original) with 1 tablespoon brown sugar and 1 teaspoon apple cider vinegar for 3-4 minutes until slightly thickened.
Brush this glaze over the baked chicken legs in the last 5 minutes of baking. The sugar caramelizes, creating a sticky, flavorful crust that pairs perfectly with the crispy breading. 🔥
Nutrition facts
Frequently asked questions
Can I use boneless chicken thighs instead of bone-in legs?
Boneless thighs work beautifully and cook faster. Just reduce the baking time by 5-7 minutes since they're thinner. The breading technique remains identical—just press it firmly onto the meat. For extra crispiness, use 1 extra tablespoon of panko on each thigh to compensate for the smaller surface area.
Why did my breading turn out greasy instead of crispy?
Greasy breading usually means the chicken wasn't dry enough or the oven temperature fluctuated. Always pat legs completely dry before breading, and ensure your oven is fully preheated to 425°F. Another trick: bake on the middle rack where heat circulates best. If using frozen chicken, thaw completely first—ice crystals cause soggy breading.
How do I reheat these without losing the crunch?
Reheat at 375°F for 10-12 minutes on a wire rack placed over a baking sheet. The rack prevents steam from making the breading soggy. For extra crispiness, broil for 1-2 minutes at the end (watch closely!). Never microwave—it turns breading rubbery. A quick oven refresh works best for maintaining that golden crunch.
Can I make this ahead of time for a party?
Yes! Assemble the breaded chicken and refrigerate uncovered for up to 24 hours—this helps the coating dry slightly for better crispiness. Bake straight from the fridge (add 5-7 minutes to cooking time). For freezing, bake completely, cool, then freeze on a wire rack. Reheat as directed above. Pro tip: Freeze in single layers with parchment between them to prevent sticking.
What's the best way to keep the breading crispy when serving?
Serve on a wire rack over paper towels to wick away moisture. Keep the chicken in a 200°F oven until serving if making ahead. For buffet-style setups, place legs on a cooling rack over a tray lined with fresh paper towels. Avoid covering with foil or plastic—they trap steam. The key is airflow to maintain that perfect crunch.